


Tired of blankets draped haphazardly? Discover how to build a DIY budget friendly blanket ladder – a stylish, space-saving solution that adds charm without breaking the bank. This comprehensive guide walks you through every step, from selecting materials to adding the perfect finishing touches. Get ready to transform your living space!
Why a DIY Budget Friendly Blanket Ladder is a Must-Have
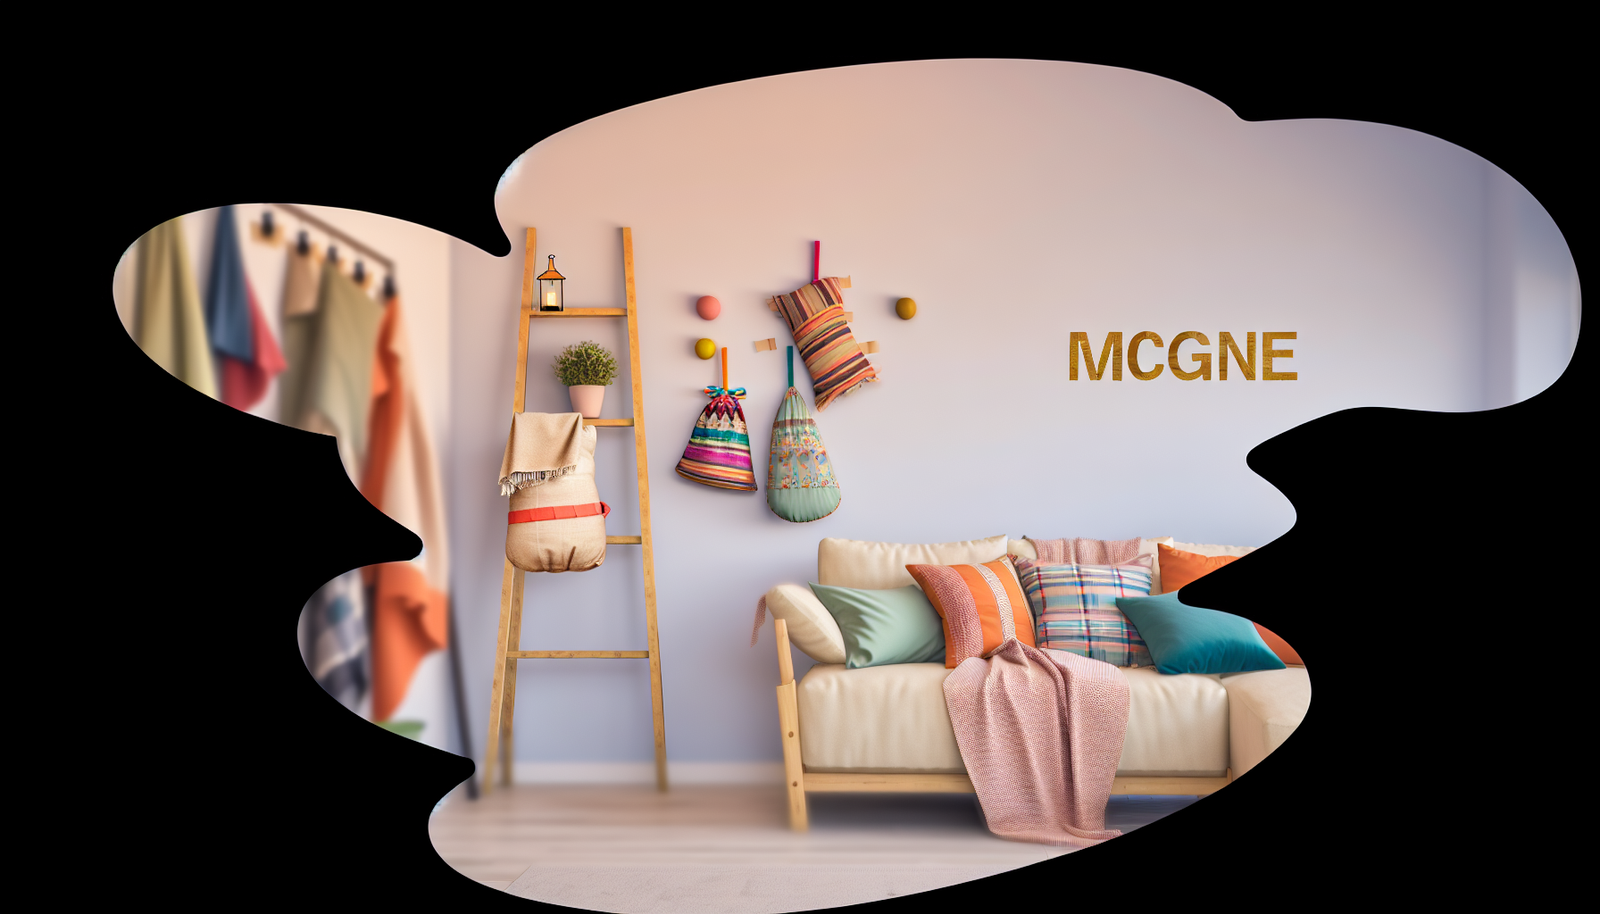
Let’s be real: blankets have a way of taking over. They begin neatly folded on the sofa, then migrate to the floor, bunched on an armchair, or even forgotten in a laundry basket. This common household conundrum often leaves us searching for a balance between cozy comfort and organized aesthetics. Enter the DIY budget friendly blanket ladder – a surprisingly simple project that tackles blanket clutter head-on while injecting a shot of modern farmhouse charm, rustic appeal, or minimalist chic into your living space.
Beyond its organizational prowess, a blanket ladder serves as a decorative focal point. Imagine beautifully textured throws, carefully curated, displayed like works of art rather than a forgotten pile. This isn’t just about tidiness; it’s about elevating your interior design without shelling out hundreds for boutique furniture. Whether you’re a seasoned DIY enthusiast or have never picked up a power tool, crafting your own blanket ladder is an incredibly rewarding experience. It’s a project that builds confidence, saves money, and culminates in a functional, beautiful piece you’ll adore. In this guide, we’ll cover everything you need to know to construct a sturdy, stylish, and truly personal blanket ladder.
We’ll dive deep into material choices, essential tools, step-by-step instructions, and creative customization ideas. By the end, you’ll not only have a fabulous new piece of furniture but also the satisfaction of knowing you built it yourself. Ready to reclaim your living room and showcase your treasured throws? Let’s get started on your very own DIY budget friendly blanket ladder!
Planning Your Perfect Blanket Ladder: Dimensions & Design
Before any wood is cut or screws are driven, proper planning sets the stage for a successful DIY budget friendly blanket ladder. This initial phase involves considering the ladder’s dimensions, the space it will occupy, and the overall aesthetic you’re aiming for. Think about the types of blankets you’ll store and how many you typically keep accessible.
Standard Blanket Ladder Dimensions: A Starting Point
While there’s no strict standard, most blanket ladders range within these measurements:
- Height: 5 to 6 feet (60-72 inches). This allows enough vertical space for blankets to drape without touching the floor and provides multiple rungs.
- Width: 18 to 24 inches. A wider ladder can accommodate larger throws or more blankets per rung, but also takes up more wall space. Consider your wall size and the folded width of your largest blankets.
- Rung Spacing: 8 to 12 inches between rungs. Optimal spacing prevents blankets from looking too squished or too sparse.
- Depth (Side Rails): 1.5 to 2.5 inches. This determines how much the ladder protrudes from the wall and influences its visual weight.
For a great starter DIY budget friendly blanket ladder, aim for 60 inches tall by 20 inches wide, with 10-inch spacing between rungs. This is generally versatile for most spaces and blanket sizes.
Assessing Your Space & Blanket Collection
Take a moment to look at where your new blanket ladder will live. Is it going against a large, open wall or tucked into a cozy corner? Measure the available wall space. Also, gather the blankets you intend to display. Fold them and measure their typical width. This will help you determine the ideal width for your ladder rungs.
Are your blankets thick quilts or light throws? Thicker blankets might require slightly more rung spacing to hang nicely. Do you have a large collection, or just a few favorites? Answering these questions ensures your DIY budget friendly blanket ladder is both functional and aesthetically pleasing for your specific needs.
Design Styles: Matching Your Home’s Aesthetic
The beauty of a DIY budget friendly blanket ladder is its adaptability to various decor styles:
- Modern Farmhouse: Often features distressed wood, white or natural finishes, and simple lines.
- Rustic/Industrial: Reclaimed wood, dark stains, or even metal pipes for rungs can achieve this look.
- Minimalist: Clean lines, light-colored wood, smooth finishes, and sparse ornamentation.
- Boho Chic: Natural wood, slightly wider dimensions, perhaps even some carved details or unique rung materials.
Consider your existing furniture and color palette. Do you want the ladder to blend in seamlessly or act as a subtle accent piece? This decision will guide your choice of wood, stain, or paint later on.
Visual example: Imagine a sleek, light-stained pine ladder against a light gray wall for a Scandinavian feel, or a chunky, darkly stained oak ladder in a room with exposed brick and leather furniture. The choice is yours!
Gathering Your Essentials: Materials & Tools for Your Project
A truly DIY budget friendly blanket ladder starts with smart material selection and having the right tools on hand. Don’t worry if your workshop isn’t fully stocked; many of these tools can be rented or borrowed, and the materials are readily available at any home improvement store. Prioritizing quality, even on a budget, ensures a sturdy and long-lasting piece.
Wood Selection: Budget-Friendly & Beautiful
The type of wood you choose will impact both the cost and the final look of your blanket ladder. Here are some excellent budget-friendly options:
- Pine: This is arguably the most popular choice for a DIY budget friendly blanket ladder. It’s inexpensive, readily available, easy to work with, and takes stain and paint well. Look for knot-free or minimal-knot pine for a cleaner look.
- Poplar: Slightly more expensive than pine but boasts a smoother grain and fewer knots. It’s also easy to work with and finishes beautifully.
- Whitewood/Fir: Often lumped together, these are similar to pine in cost and workability, offering good value.
- Reclaimed Pallet Wood: If you’re really aiming for budget and a rustic aesthetic, reclaimed pallet wood can be free! Be cautious, though; ensure it’s safe (e.g., not treated with chemicals) and be prepared for more sanding and prep work.
- Hardwoods (Oak, Maple): While beautiful and durable, these tend to be significantly more expensive and harder to work with, pushing beyond the ‘budget friendly’ scope for most.
For a standard 5-6 foot ladder, you will typically need:
- Side Rails: Two (2) pieces of 1×2 or 1×3 lumber, each 6 feet long. (e.g., 1x3x6′ pine boards)
- Rungs: Four to five (4-5) pieces of 1×2 lumber, each 18-24 inches long (to match your chosen ladder width). (e.g., 1x2x8′ pine board, cut down)
Total wood cost for a pine ladder could be as low as $20-$30, making this a truly affordable project.
Essential Tools Checklist
Having the right tools makes the project smoother and safer:
- Measuring Tape: Crucial for accurate cuts.
- Pencil: For marking cut lines and drill points.
- Safety Glasses & Hearing Protection: Always prioritize safety when using power tools.
- Saw:
- Miter Saw (Recommended): Provides precise, clean crosscuts. Excellent for straight cuts for your rungs and side rails.
- Circular Saw: Can be used with a guide for straight cuts.
- Hand Saw & Miter Box: A budget alternative, but takes more effort and precision.
- Drill/Driver:
- Cordless Drill: Ideal for pre-drilling pilot holes and driving screws.
- Drill Bits: Assorted sizes, including a drill bit slightly smaller than your screws for pilot holes, and a countersink bit if you want screw heads flush.
- Sandpaper or Orbital Sander: Essential for smoothing rough edges and preparing wood for finishing. Start with 100-120 grit, then move to 180-220 grit.
- Wood Glue: Provides extra strength to your joints.
- Clamps (Optional but Recommended): Bar clamps or F-clamps help hold pieces together during assembly and while glue dries.
- Straight Edge or Square: For ensuring square cuts and alignment.
Hardware & Finishing Supplies
Don’t forget the smaller, but equally important, items:
- Wood Screws: 1 1/2 inch to 2-inch wood screws are generally suitable. Choose coarse-thread screws for better holding power in softwood.
- Wood Filler (Optional): For filling any imperfections or screw holes if you plan on painting.
- Stain, Paint, or Sealer:
- Wood Stain: To enhance the wood grain and add color.
- Paint: For a solid color finish (e.g., white for farmhouse, black for modern).
- Clear Coat/Polyurethane/Wax: To protect the wood and provide a durable finish, especially if using stain.
- Brushes, Rags, or Foam Applicators: For applying your chosen finish.
- Drop Cloths/Newspaper: To protect your work surface.
By carefully planning and gathering all materials and tools, you’ll be well-prepared to construct your stylish DIY budget friendly blanket ladder efficiently and safely.
Building Your Blanket Ladder: A Detailed How-To Guide
Now for the fun part: bringing your DIY budget friendly blanket ladder to life! Follow these steps carefully for a sturdy, safe, and beautiful result. Remember to measure twice, cut once!
Step 1: Making Your Cuts
Cut the Side Rails:
Using your measuring tape and pencil, mark two (2) of your 1×3 boards to your desired length (e.g., 60 inches or 5 feet). Use your miter saw (or circular saw with a guide) to make accurate, straight cuts. These will be the vertical sides of your blanket ladder.
Cut the Rungs:
Next, measure and mark your 1×2 boards for the rungs. If you chose a ladder width of 20 inches, cut four to five (4-5) pieces that are exactly 20 inches long. Consistency in these cuts is key for a uniform look. Remember, the rungs are the horizontal bars where blankets will rest.
Step 2: Sanding for Smoothness
Initial Coarse Sanding (100-120 Grit):
Use an orbital sander or sandpaper (100-120 grit) to smooth all cut edges and surfaces of your wood pieces. This removes splinters, rough patches, and any pencil marks. Pay extra attention to the rung pieces, as blankets will be frequently sliding over them.
Fine Sanding (180-220 Grit):
Follow up with a finer grit sandpaper (180-220) for an even smoother finish. This step is crucial if you plan to stain your ladder, as it allows the stain to apply more evenly. If painting, fine sanding still ensures a professional look. Wipe away all sawdust with a damp cloth afterward.
Step 3: Marking Rung Placement
Measuring and Marking:
Lay one of your side rails flat on your work surface. Starting from the top, measure down 6-10 inches and make a mark. This top spacing prevents blankets from hitting the ceiling or being too high. From that first mark, measure down your chosen rung spacing (e.g., 10 inches) and mark for the center of each subsequent rung. Repeat this process for all your rungs on both side rails, ensuring the marks align perfectly.
Pro Tip: Use a speed square to extend your marks across the width of the side rail, ensuring your rungs will be level. Alternatively, clamp your two side rails together and mark them simultaneously for perfect symmetry.
Step 4: Pre-drilling Pilot Holes
Preventing Splits and Ensuring Security:
Using a drill bit slightly smaller than your chosen screws, pre-drill two pilot holes at each rung mark on both side rails. This step is critical for preventing wood from splitting when driving screws, especially in softer woods like pine. If you have a countersink bit, use it to create a shallow depression for the screw heads to sit flush with the wood surface. This gives a cleaner, more professional finish to your DIY budget friendly blanket ladder.
Step 5: Assembly – The Grand Finale!
Attaching the Rungs:
Lay one side rail flat. Apply a thin, even bead of wood glue to the ends of one rung. Align the rung with your marked pilot holes on the side rail. Use clamps to hold it securely in place while you drive screws through the pilot holes. Repeat this process for all rungs, working your way down the ladder.
Once all rungs are attached to the first side rail, bring over the second side rail. Apply glue to the exposed ends of the rungs and align it with the corresponding pilot holes on the second side rail. Carefully drive in the remaining screws. Ensure the ladder is square and the rungs are level as you go. Wipe away any excess glue immediately with a damp cloth.
Allow the wood glue to dry completely according to the manufacturer’s instructions (usually 24 hours) before moving on to finishing. This ensures maximum joint strength for your beautiful DIY budget friendly blanket ladder.
You’ve built it! The hardest part is over. Now comes the rewarding step of adding personality with your chosen finish.
Finishing Touches: Staining, Painting, & Protecting Your Creation
Once your DIY budget friendly blanket ladder is assembled and the glue is dry, it’s time to add the finishing touches that truly make it shine. This step not only protects the wood but also allows you to customize the ladder to perfectly match your home decor. From rustic stains to crisp paints, the possibilities are endless.
Pre-Finishing Preparation: Don’t Skip This!
- Final Sanding: Even after initial sanding, a light pass with 220-grit sandpaper over all surfaces will ensure optimal adhesion for your chosen finish. Feel for any missed rough spots.
- Dust Removal: Use a shop vac or a tack cloth (a slightly sticky cloth designed to pick up fine dust) to thoroughly remove all sawdust. Any lingering dust will get caught in your finish, creating an uneven texture.
- Wood Filler (Optional): If you’ve countersunk your screws and want a completely seamless look, fill the screw holes with wood filler. Let it dry, then sand flush with the surrounding wood before proceeding.
Stains: Enhancing Natural Wood Beauty
Staining is perfect if you want to highlight the natural grain of the wood. It gives a warm, rich appearance that works well with farmhouse, rustic, and even some modern styles.
- Application: Apply stain with a brush or rag, going with the direction of the wood grain. Allow it to penetrate for a few minutes (check the product’s instructions as this varies), then wipe off any excess with a clean rag. The longer you leave it, the deeper the color.
- Color Choice:
- Light Stains (e.g., natural, golden oak, pickling white): Ideal for a bright, airy, or Scandinavian feel.
- Medium Stains (e.g., early American, special walnut): Versatile and popular for a classic, warm wood look.
- Dark Stains (e.g., dark walnut, espresso): Creates a dramatic, rich effect, great for industrial or sophisticated spaces.
- Drying Time: Allow ample drying time between coats and before applying a topcoat, usually 24-48 hours.
A beautifully stained DIY budget friendly blanket ladder can become a true heirloom piece.
Paints: A Pop of Color or Classic Clean Lines
Painting your ladder allows for a bolder statement or a cleaner, more uniform look that can seamlessly blend with your existing decor.
- Primer (Recommended): Especially if using pine, a good quality wood primer will prevent knots from bleeding through and help the paint adhere better, resulting in a more durable finish. Apply one to two thin coats and let dry.
- Paint Application: Use a high-quality brush or foam roller for a smooth finish. Apply two thin coats of paint, allowing adequate drying time between each. Sand lightly with 220-grit sandpaper between coats for a super-smooth result.
- Color Choice:
- White/Off-White: Classic, bright, and perfect for farmhouse, shabby chic, or minimalist styles.
- Black/Charcoal: Modern, sophisticated, and can add a striking contrast.
- Bold Colors (e.g., navy, emerald green): For a statement piece in a more eclectic or vibrant space.
A freshly painted DIY budget friendly blanket ladder can entirely change the feel of a room.
Protective Topcoats: The Key to Longevity
Regardless of whether you stain or paint, a protective topcoat is essential for durability, especially for a piece that will get frequent use.
- Polyurethane (Water-Based or Oil-Based):
- Water-Based: Dries faster, cleans up with water, and won’t yellow over time (good for white paint). Less durable than oil-based.
- Oil-Based: More durable, provides a richer amber tone (can yellow lighter paints/stains), cleans up with mineral spirits.
Apply 2-3 thin coats, sanding lightly with 220-grit sandpaper between coats for a smoother, stronger finish.
- Wax Finishes: For a softer, hand-rubbed look, especially over chalk paint or dark stains. Less protective than polyurethane but easy to apply and repair.
- Clear Lacquer: Dries very fast and creates a hard, durable finish with good clarity. Often applied with a spray gun for best results, but spray cans are available.
Allow your DIY budget friendly blanket ladder to fully cure for several days (check product instructions) before loading it with blankets. This ensures the finish is hardened and won’t be damaged. Take pride in your newly finished, custom piece!
Styling Your Blanket Ladder: Beyond Just Blankets
Your newly crafted DIY budget friendly blanket ladder is more than just a place to hang throws; it’s a versatile decorative piece that can elevate the style and organization of any room. Let’s explore how to make it truly shine and even discover its hidden potential.
The Art of Arranging Blankets
How you drape your blankets can significantly impact the overall aesthetic. It’s not just about tossing them on; it’s about thoughtful arrangement:
- Layering for Texture: Don’t be afraid to mix and match. Combine chunky knits with faux fur, soft cotton throws with delicate linen. Aim for a variety of textures to create visual interest. For instance, a thick, cable-knit throw on the top rung, a softer waffle-weave throw below, and a lightweight linen blanket at the bottom.
- Color Harmony: Consider a cohesive color palette. Perhaps a gradient from light to dark, or a mix of complementary colors that tie into your room’s decor. Neutrals always look elegant, but a strategically placed pop of color can draw the eye.
- The Effortless Drape: Instead of perfectly folded squares, try a more relaxed, casual drape. Fold blankets lengthwise once or twice, then drape them over the rung, allowing the ends to fall naturally. This gives a soft, inviting look. Play around with letting one end hang longer than the other for an asymmetrical touch.
- Less is More (Sometimes): You don’t need to fill every rung. Sometimes, displaying just two or three carefully chosen blankets can be more impactful than a ladder overflowing with throws. This allows each blanket to stand out.
A well-styled DIY budget friendly blanket ladder speaks volumes about your attention to detail.
Creative Uses for Your Blanket Ladder
Who says a blanket ladder is only for blankets? Its vertical structure and open design make it incredibly adaptable:
- Bathroom Towel Organizer: In a bathroom, it’s a chic way to store extra guest towels, particularly fluffy, rolled bath towels. This looks much more appealing than a stack in a cabinet.
- Magazine & Book Display: Prop magazines or thin books over the rungs in a living room or reading nook. A perfect way to keep reading material tidy yet accessible.
- Scarf & Accessory Holder: In a bedroom or closet, a blanket ladder can become a stylish display for scarves, ties, or even delicate necklaces and handbags. This keeps them unwrinkled and visible.
- Plant Hanger (with modifications): With S-hooks and small potted plants, you can transform your ladder into a vertical garden, especially for succulents or air plants. Ensure the pots are lightweight and securely attached.
- Holiday Decor Display: During the holidays, dress up your ladder with string lights, garlands, stockings, or festive fabric swags. It’s an instant holiday focal point!
- Entryway Catch-All: Hang light jackets, umbrellas, or reusable shopping bags in an entryway or mudroom. Combine it with a small basket at the bottom for shoes.
The versatility of a DIY budget friendly blanket ladder means it can evolve with your needs and seasonal decor changes.
Placement and Safety Considerations
Where you place your ladder can optimize its function and enhance the room:
- Living Room: Lean it against an empty wall space, next to a sofa, or even behind an accent chair.
- Bedroom: Perfect for a wall next to your bed, or at the foot of the bed, creating a cozy vignette.
- Nursery/Kids Room: A charming way to store baby blankets, quilts, or even hanging fabric books. Ensure it’s very stable and perhaps anchored if in a child’s room.
- Corner Spaces: A blanket ladder can beautifully fill an awkward or unused corner, adding height and dimension.
Safety First: While a blanket ladder isn’t designed for climbing, it should be stable. For extra security, especially if you have children or pets, consider using felt pads on the bottom to prevent sliding. Alternatively, you can use furniture wall anchors to secure the top of the ladder to the wall discreetly, especially if you plan to hang heavier items or live in an earthquake-prone area. This small step ensures your DIY budget friendly blanket ladder stays put.
Troubleshooting & Maintaining Your DIY Blanket Ladder
Even the most perfectly executed DIY budget friendly blanket ladder might present minor challenges, and proper care ensures its longevity. Don’t worry, most issues are easily fixable, and a little maintenance goes a long way!
Common DIY Challenges & Solutions
- Wobbly Ladder:
- Cause: Uneven cuts on side rails or rungs, or screws not fully tightened.
- Solution: Check all screw connections and tighten if necessary. If cuts are uneven, you may need to add felt pads to the bottom of the shorter leg to level it. For significant wobble, carefully disassemble, re-measure, re-cut, and reassemble, ensuring everything is square. Adding wood glue during assembly is crucial for stability.
- Splitting Wood When Screwing:
- Cause: Not pre-drilling pilot holes, or pilot holes are too small.
- Solution: Always pre-drill pilot holes with a bit slightly smaller than your screw shank. If a split has occurred, you can try to repair it with wood glue and clamps. For larger splits, wood filler can sometimes mask the damage, especially if painting.
- Uneven Stain/Paint Finish:
- Cause: Insufficient sanding, improper surface prep (dust), uneven application, or rushing drying times.
- Solution: For stain, light sanding (220-grit) and reapplication can help. For paint, light sanding and another thin coat usually works. Always ensure the surface is clean and dry before applying any finish. Apply thin, even coats.
- Rungs Too Close/Far Apart:
- Cause: Incorrect initial measurement for rung spacing.
- Solution: This is harder to fix without major disassembly. If rungs are too close, you might remove one to create more space, but that leaves holes. If too far apart, you could add an extra rung, drilling new pilot holes and attaching. This highlights the importance of careful planning in the “Planning Your Perfect Ladder” section!
Routine Care & Maintenance for Your Blanket Ladder
To keep your DIY budget friendly blanket ladder looking its best for years to come, integrate these simple care practices:
- Regular Dusting: Just like any other piece of furniture, dust your ladder regularly with a soft, dry cloth. This prevents dust buildup that can dull the finish.
- Gentle Cleaning: If needed, wipe down the wood with a slightly damp cloth (water only, or a very mild wood cleaner if appropriate for your finish). Avoid harsh chemicals that can strip or damage paint/stain.
- Protect from Sunlight: Direct, prolonged sunlight can cause wood finishes to fade or dry out. If possible, place your ladder away from direct window exposure or use UV-filtering window treatments.
- Avoid Overloading: While sturdy, don’t overload your ladder with excessively heavy items or too many blankets. It’s designed for lightweight throws, not heavy quilts in bulk.
- Check Connections Periodically: Every few months, give your ladder a gentle shake and check all screws. Tighten any that feel loose. This simple step prevents wobbles from developing over time.
- Touch-Up Scratches: If your ladder gets a minor scratch, you can often touch it up with a matching stain pen, paint, or a dab of protective clear coat.
- Felt Pads on Feet: Ensure felt pads are still attached to the bottom of the side rails, especially if on hard flooring. These protect both your floor and prevent the ladder from sliding.
Your DIY budget friendly blanket ladder is made to be used and admired. With a little attention, it will remain a functional and beautiful part of your home decor for a long time.
Get Creative: Advanced Techniques & Design Variations
While the basic DIY budget friendly blanket ladder is a fantastic starting point, don’t limit your imagination! There are countless ways to customize your ladder, making it truly unique and perfectly tailored to your individual style and needs. These variations can transform a simple ladder into a statement piece.
Beyond Basic Wood: Material Experiments
- Copper Pipe Rungs: For an industrial-chic vibe, use copper or galvanized steel pipes for the rungs instead of wood. You’ll need specific fittings (e.g., floor flanges and elbows) and tools to secure these to wooden side rails. This adds a beautiful metallic accent and can be surprisingly affordable if you source pipes strategically.
- Dowel Rods: For a lighter, more minimalist look, use round wooden dowel rods for rungs. You’d drill holes (using a drill bit slightly smaller than the dowel) through the side rails and glue the dowels directly into the holes. This creates a seamlessly integrated appearance, often seen in Scandinavian designs.
- Live Edge Wood: If you’re going for a truly rustic or organic feel, consider finding some live edge wood (wood with bark still on one or both edges) for the side rails for your DIY budget friendly blanket ladder. This will require more specialized tools for cutting and finishing, but the natural beauty is unparalleled.
- Mixed Materials: Combine wood side rails with leather straps for rungs, or even thick rope. These non-traditional materials add unique texture and visual interest, perfect for a bohemian or eclectic space.
Integrated Storage & Functionality
Elevate your blanket ladder by adding extra features:
- Basket Hooks: Attach small S-hooks or decorative cup hooks to the side rails. These can hold small baskets for remotes, eyeglasses, or even small potted plants, adding functionality to your DIY budget friendly blanket ladder.
- Bottom Shelf/Platform: Extend the bottom rung to create a small platform or shelf. This is perfect for placing a decorative planter, a stack of books, or a storage box for loose items. This requires a slightly wider plank for the bottom ‘rung’.
- Magnetic Strip: Attach a thin magnetic strip to one of the side rails (recessed, if possible) to hold small metal items like keys or sewing scissors.
- LED Lighting: For a subtle, ambient glow, affix a battery-operated LED strip light to the back of one of the side rails. This can highlight your blankets and create a warm atmosphere, especially in the evenings.
Aesthetic Enhancements & Customization
- Distressing Techniques: To achieve a vintage or farmhouse look, distress your painted or stained ladder. This can involve lightly sanding edges after painting, using a wire brush to create texture, or applying a dark wax over lighter paint to age it.
- Two-Tone Finish: Paint the side rails one color (e.g., white) and stain the rungs a contrasting wood tone, or vice-versa. This creates a dynamic visual effect and highlights the different components of your DIY budget friendly blanket ladder.
- Decorative Feet: Instead of simple cut ends, consider adding small, decorative wooden feet or bun feet to the bottom of your side rails. These can be purchased at most hardware stores and attached with screws or glue.
- Carved or Stenciled Details: For the truly artistic, subtle carving on the side rails or stenciled patterns can add a personalized touch. Think geometric designs, monograms, or even a simple leaf motif.
- Asymmetrical Design: While most ladders are symmetrical, consider offsetting some rungs or varying the rung spacing for a more modern, artistic look. This requires careful planning to ensure stability.
Remember, the goal is not just to build a blanket ladder, but to craft a piece that reflects your personal style and enhances your home. Have fun experimenting with these ideas and make your DIY budget friendly blanket ladder truly your own!
Frequently Asked Questions About DIY Blanket Ladders
What is the best type of wood for a DIY budget friendly blanket ladder?
Pine is generally considered the best choice for a DIY budget friendly blanket ladder. It’s inexpensive, widely available, easy to cut and sand, and takes stain or paint beautifully. Poplar and whitewood are other excellent, affordable alternatives that offer similar workability.
How tall should a blanket ladder be?
Most blanket ladders are between 5 to 6 feet (60-72 inches) tall. This height allows enough vertical space for blankets to drape nicely without touching the floor and provides multiple rungs for display. Consider your ceiling height and the available wall space when deciding.
How many blankets can a ladder typically hold?
A typical blanket ladder with 4-5 rungs can comfortably hold 4-5 blankets if one is draped over each rung. You can often double up thinner throws on a single rung for a cozy, layered look, potentially holding 6-8 blankets. It depends on the thickness of your blankets and rung spacing.
Do I need to secure a blanket ladder to the wall?
While many blanket ladders simply lean against the wall, securing it is recommended, especially in homes with children, pets, or if you plan to hang heavy items. You can use felt pads on the bottom to prevent sliding, or small furniture wall anchors at the top for added stability and safety. This is a crucial step for preventing accidental tipping.
Can I make a blanket ladder from reclaimed wood?
Absolutely! Reclaimed wood, especially from pallets, can make an incredibly charming and truly budget friendly blanket ladder. Just ensure the wood is clean, free of harmful chemicals (look for “HT” stamp for heat-treated, avoid “MB” for methyl bromide), and be prepared for extra sanding and cleaning to remove splinters and dirt.
What’s the best finish for a blanket ladder?
The best
finish depends on your desired look. For a natural wood appearance, a wood stain followed by 2-3 coats of polyurethane (water-based for light woods, oil-based for richer tones) is ideal. If you want a solid color, prime the wood and apply two thin coats of latex or acrylic paint, also finished with polyurethane for durability. Wax is good for a softer, matte look, especially over chalk paint.
What woodworking skills do I need for this project?
This is a beginner-friendly project! You’ll need basic measuring skills, comfort with cutting wood (a miter saw makes it easier, but a hand saw works), and experience using an electric drill/driver. Sanding and applying a finish are straightforward tasks. Precision in measuring and cutting is more important than advanced techniques.
Content Disclaimer
The information provided in this article is for general informational and educational purposes only, and is not a substitute for professional advice. While we strive to provide accurate information, DIY projects carry inherent risks. Always consult with a qualified professional or seek expert advice before undertaking any home improvement project, especially those involving power tools or structural changes. We do not provide professional financial, health, or legal advice. Results may vary based on individual skill, materials used, and specific circumstances. We assume no responsibility for any loss, injury, or damage incurred as a result of following the information presented herein.
Categories
- Accent Walls & Ceilings (61)
- Art Curation & Gallery (62)
- Bedding Style Trends (68)
- Bedroom Makeover (81)
- Bohemian & Eclectic Styles (58)
- DIY & Budget-Friendly Decor (64)
- Eco-Friendly Design (62)
- Furniture Care (71)
- Home Decor & Design Ideas (162)
- Home Wellness Spaces (59)
- Integrated Outdoor Living (67)
- Japandi Style (61)
- Kids and Nursery Decor (59)
- Living Room Decor (79)
- Mix & Match Techniques (73)
- Modern & Contemporary Design (66)
- Rug Sizing & Placement (73)
- Scandinavian Design Inspiration (20)
- Seasonal Home Decor (79)
- Small Space Solutions (73)
- Wall Art & Painting Tips (77)
Recent Comments
Archives
Product Gallery
-
 Large Area Green Rugs for Bedroom Nordic Living Room Decoration Shaped Carpet Irregular Plush Lounge Rug Home Thick Washable Mat
Rated 5.00 out of 5$55.01 – $346.86Price range: $55.01 through $346.86
Large Area Green Rugs for Bedroom Nordic Living Room Decoration Shaped Carpet Irregular Plush Lounge Rug Home Thick Washable Mat
Rated 5.00 out of 5$55.01 – $346.86Price range: $55.01 through $346.86 -
 Nordic Style Rugs for Bedroom Morandi Living Room Decoration Carpet Large Area Geometry Lounge Rug Home Cloakroom Non-slip Mat
Rated 5.00 out of 5$39.51 – $598.43Price range: $39.51 through $598.43
Nordic Style Rugs for Bedroom Morandi Living Room Decoration Carpet Large Area Geometry Lounge Rug Home Cloakroom Non-slip Mat
Rated 5.00 out of 5$39.51 – $598.43Price range: $39.51 through $598.43 -
 Irregular Shapes Living Room Decoration Carpet Modern Style Rugs for Bedroom Home Thicken Plush Rug Fluffy Soft Lounge Floor Mat
Rated 4.83 out of 5$55.91 – $347.82Price range: $55.91 through $347.82
Irregular Shapes Living Room Decoration Carpet Modern Style Rugs for Bedroom Home Thicken Plush Rug Fluffy Soft Lounge Floor Mat
Rated 4.83 out of 5$55.91 – $347.82Price range: $55.91 through $347.82


