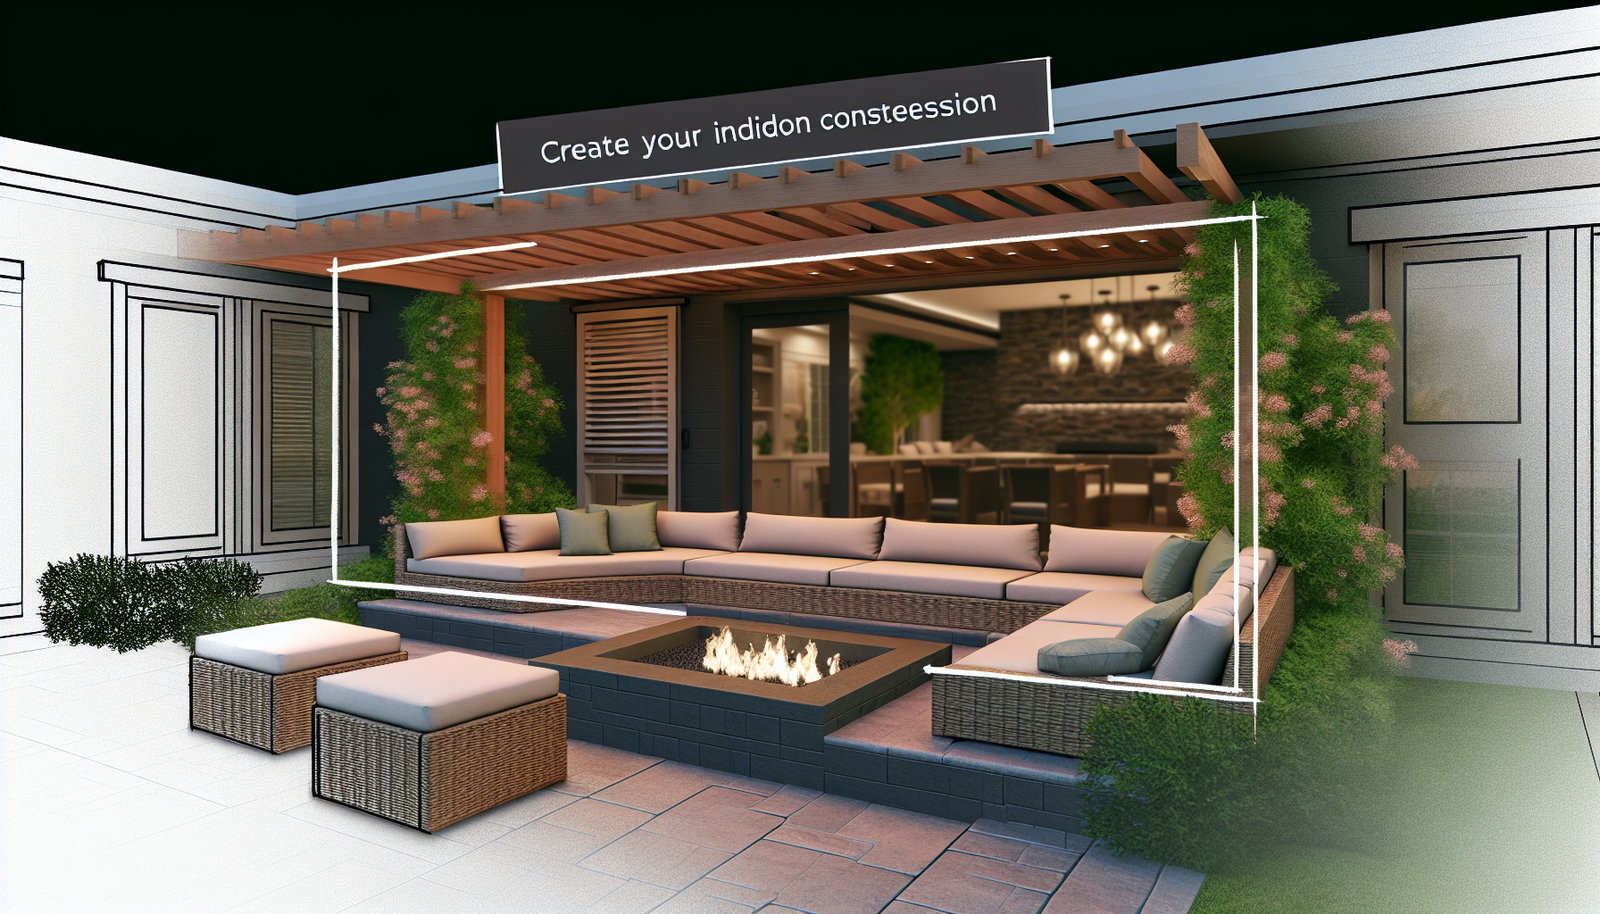
Imagine cool evenings under a star-strewn sky, the warmth of a crackling fire, and the joyous laughter of friends and family gathered in your own backyard oasis. This isn’t just a fantasy; it’s the very inviting reality of owning an outdoor conversation pit with built-in seating. These unique landscape features are rapidly becoming the centerpiece of modern outdoor living, transforming dull patios and yards into vibrant, functional, and deeply inviting social hubs.
Forget flimsy patio furniture that gets tossed by the wind. We’re talking about a permanent, elegant, and incredibly comfortable solution that elevates your backyard’s aesthetic and usability. Whether you’re dreaming of intimate fireside chats, lively dinner parties, or a serene spot for morning coffee, designing an outdoor conversation pit with integrated seating offers unparalleled opportunities for connection and relaxation. But where do you even begin? The possibilities can feel endless, from choosing the right materials to navigating local building codes. This comprehensive guide will walk you through every critical step, ensuring you achieve the outdoor retreat you’ve always envisioned. By the end, you’ll have a clear roadmap to create a stunning, high-value addition to your home that will be cherished for years.
Ready to unlock your backyard’s full potential? In this guide, you’ll learn:
- The magnetic appeal of conversation pits and why they’re a smart investment.
- Key design considerations that balance aesthetics with functionality.
- A deep dive into materials, from natural stone to durable composites.
- Essential planning steps, including site selection and permitting.
- Construction insights for a safe and lasting structure.
- Tips for furnishing, lighting, and maintaining your new outdoor haven.
The Irresistible Allure of Outdoor Conversation Pits with Built-In Seating
What makes an outdoor conversation pit with built-in seating so much more appealing than a standalone fire pit and some chairs? It’s not just about aesthetics; it’s about creating an experience. These structures inherently foster intimacy and connection. The slightly sunken design or the encircling built-in benches naturally draw people closer, encouraging conversation and camaraderie. It’s a design choice that signals “gather here, relax, and stay a while.”
Beyond the Aesthetic: Functional Benefits and Property Value
Beyond their charm, these features offer significant practical advantages. They provide a designated, durable, and comfortable gathering spot that can withstand the elements far better than most portable furniture. This permanence means less setup and takedown, and a consistently inviting space. From a property value perspective, a well-designed outdoor conversation pit is a premium landscape feature that significantly boosts curb appeal and resale value. Real estate experts often highlight outdoor living spaces as key selling points, and a custom-built pit fits this bill perfectly.
- Durability: Built-in seating, typically constructed from stone, concrete, or weather-resistant wood, offers longevity unmatched by outdoor furniture sets.
- Space Efficiency: Integral seating often allows for more people in a smaller footprint compared to individual chairs, especially in circular or curved designs.
- Low Maintenance: Once constructed, built-in seating requires minimal upkeep compared to cushions and frames that need regular cleaning and storage.
- Enhanced Safety: A well-designed pit with built-in seating often incorporates safer distances from the flame and stable seating arrangements, reducing accident risks.
This central gathering point becomes a focal element, a place where memories are made, stories are shared, and laughter echoes under the open sky. It’s an investment in your lifestyle and your home.
Mastering the Design: Key Considerations for Your Outdoor Conversation Pit
Designing an outdoor conversation pit is an exciting endeavor that blends architectural elements with natural beauty. Success hinges on careful planning and understanding how various components work together. Think of it as crafting an outdoor room, complete with “walls” (the seating), a “ceiling” (the sky), and a captivating centerpiece (the fire feature). Every decision, from shape to material, contributes to the overall ambiance and functionality.
1. Site Selection: The Foundation of Your Outdoor Sanctuary
Choosing the right location is paramount. This isn’t just about what “looks good.” It involves practical considerations like safety, accessibility, and integration with your existing landscape. A well-chosen site will ensure privacy, safety, and seamless flow from your home.
- Proximity to Home: Consider how far guests will need to carry drinks or food. Too far, and it becomes inconvenient; too close, and it might feel like an extension of your patio rather than a distinct zone.
- Wind and Weather: Observe prevailing winds. Your pit should ideally be sheltered to prevent smoke from blowing into faces and to ensure comfort. Consider natural windbreaks like existing structures or dense plantings.
- Underground Utilities: Before any digging, always contact your local utility companies (e.g., “Dig Safe” or “811” in the US) to mark underground lines for gas, water, electric, and sewer. This is a non-negotiable safety step.
- Views: Maximize scenic views while minimizing undesirable ones (e.g., a neighbor’s shed). The pit might also become a focal point from inside your home.
- Sunlight and Shade: Understand how sunlight moves across the site throughout the day and year. Your pit might need shade during peak summer afternoons or prefer full sun in cooler months.
2. Shape and Size: Crafting the Perfect Embrace
The shape and size of your outdoor conversation pit with built-in seating dictate its capacity and the type of interactions it encourages.
- Circular: The most classic and intimate shape, promoting equal interaction among everyone seated. Ideal for smaller groups (4-8 people) and creating a sense of unity. A common footprint might be 10-15 feet in diameter.
- Square/Rectangular: Offers a more modern, structured look. Rectangular pits can accommodate larger groups and define a more expansive gathering area. They work well with modern architectural styles. Lengths can range from 12-20 feet.
- U-Shaped/L-Shaped: Excellent for integrating with a patio edge or creating a defined space within a larger yard. Allows for varied seating arrangements and is perfect for larger gatherings where some might prefer to lounge.
- Sunken vs. Raised:
- Sunken Pits: Offer a truly immersive, cozy, and protected feel. They often require more excavation, drainage planning, and structural support. They excel at blocking wind and providing a sense of enclosure.
- Raised Pits: Easier and less expensive to construct, especially on uneven terrain. They integrate more seamlessly with existing patio levels and offer easier access but provide less wind protection.
- Seating Dimensions: For comfortable built-in seating, aim for a bench height of 18-20 inches (similar to a dining chair) and a depth of 18-24 inches to allow for cushions. Backrests, if included, should be 12-18 inches high.
3. Fire Feature Integration: The Heart of the Pit
The fire pit itself is the central element. Careful consideration of its type, size, and fuel source is essential for both ambiance and safety.
- Wood-Burning: Classic, rustic, and offers that unmistakable aroma and crackling sound. Requires wood storage and produces ash to clean. Ensure proper ventilation and spark arrestors.
- Gas (Natural Gas or Propane): Clean-burning, instant on/off, and no ash. Can be plumbed for natural gas or use propane tanks. Offers precise flame control and often uses decorative glass or lava rocks. Propane tanks need to be discreetly stored.
- Tabletop Fire Pits: For smaller designs or supplemental use, gas fire tables can sit within a larger conversation pit, offering flexibility.
- Safety Distances: Maintain a minimum of 10 feet clearance from any combustible structures (house, fence, low-hanging branches). The fire feature should be proportionate to the seating area, allowing for safe passage.
4. Material Selection: Durability Meets Design
The materials you choose for your outdoor conversation pit with built-in seating will define its aesthetic and longevity. Prioritize durability, weather resistance, and compatibility with your home’s existing architecture.
- Natural Stone: Flagstone, slate, granite, or river rock offers unparalleled natural beauty and longevity. It’s often more expensive and labor-intensive but provides a highly custom, organic look. Requires proper foundation and skilled masonry.
- Manufactured Stone/Pavers: A more uniform and often more affordable alternative to natural stone. Comes in a vast array of colors, textures, and sizes. Easier to install than natural stone. Excellent for retaining walls that form the seating.
- Concrete Blocks (CMU): Highly durable and cost-effective. Can be finished with stucco, veneer stone, or painted to match desired aesthetics. A versatile choice for the core structure.
- Stucco: A popular finish for concrete block structures, offering smooth, modern lines or textured finishes. Can be colored to match any palette.
- Wood and Composite Lumber: For seating surfaces, especially on raised or rectangular pits, weather-resistant hardwoods (teak, ipe) or composite lumber (Trex, Azek) provide a comfortable, warmer feel. They require less maintenance than natural wood but can be costly.
- Cushions: While not a structural material, high-quality outdoor cushions (Sunbrella fabric, quick-dry foam) are essential for comfort and can add significant color and texture. Easily stored when not in use.
When selecting materials, consider your local climate. Extreme temperature fluctuations, heavy rainfall, or intense UV exposure will impact material performance over time. Always choose materials rated for outdoor use and consult with suppliers for best practices.
Planning & Permissions: Laying the Groundwork for Success
Before you break ground, strategic planning is essential to avoid costly mistakes and ensure your outdoor conversation pit with built-in seating complies with local regulations. This phase involves everything from detailed drawings to understanding permits.
1. Budgeting for Your Dream Outdoor Space
A realistic budget is crucial. Costs can vary wildly based on size, materials, labor, and complexity.
- Small (DIY-friendly, basic materials): $2,000 – $5,000. Often involves concrete blocks with simple caps, or pre-fabricated kits.
- Mid-range (Professional installation, quality materials): $8,000 – $20,000. This tier includes local contractors, manufactured stone or stucco finishes, and a basic gas fire insert.
- High-end (Custom design, premium materials, extensive landscaping): $25,000+. Features natural stone, complex designs, integrated lighting, extensive hardscaping, and professional landscaping.
Factor in not just construction but also design fees, excavation, utilities connections (gas/electric), and finishing touches like cushions and landscaping. Always allocate a 10-15% contingency fund for unexpected issues.
2. Permitting and Local Regulations: Do Your Homework
Ignoring local building codes and zoning ordinances can lead to fines, forced demolition, or safety hazards. This step is non-negotiable.
- Contact Your Local Municipality: Visit your city or county’s planning or building department website, or call them directly. Inquire about outdoor fire pit regulations, permanent structure requirements, and setback rules for impervious surfaces.
- Understand Setback Requirements: There are usually minimum distances from property lines, existing structures (house, garage, fence), and sometimes even from septic tanks or wells.
- Fire Safety Codes: Many areas have specific rules regarding outdoor fire features, including:
- Distance from combustible materials (wood fences, overhanging tree branches).
- Requirements for spark arrestors or fire screens for wood-burning pits.
- Regulations for gas line installation (often requires a licensed plumber).
- Homeowners Association (HOA) Rules: If you live in an HOA, check their covenants and restrictions. They often have specific guidelines on outdoor structures, materials, and even aesthetic approvals.
- “Dig Safe” (811) Call: As mentioned, always call 811 (in the US) or your local utility notification center several days before any excavation to have underground utility lines marked.
3. Professional Help: When to Hire an Expert
While some aspects might be DIY-friendly, certain tasks demand professional expertise.
- Landscape Architects/Designers: For complex designs, tricky sites, or seamless integration with your entire yard. They can produce detailed plans, material specifications, and 3D renderings.
- General Contractors/Landscape Contractors: If you’re not doing extensive DIY. They oversee the entire project, manage subcontractors, and ensure quality. Look for contractors with experience in hardscaping and outdoor living spaces.
- Masons: For natural stone or intricate block work, skilled masons are invaluable for structural integrity and aesthetic finish.
- Plumbers/Electricians: If you’re installing a gas fire pit, integrated lighting, or an outdoor audio system, licensed professionals are required for safety and code compliance.
- Excavators: For sunken pits, professional excavation ensures proper grading and drainage, preventing future water issues.
A good rule of thumb: if it involves utility lines, structural integrity, or significant investment, hire a vetted professional. They bring expertise, efficiency, and often, peace of mind.
Construction Essentials: Building Your Outdoor Oasis
The construction phase is where your detailed plans come to life. Following best practices for each step ensures durability, safety, and a beautiful final product for your outdoor conversation pit with built-in seating.
1. Excavation and Drainage: Foundation for Longevity
Proper groundwork is critical, especially for sunken conversation pits.
- Site Clearing: Remove all debris, vegetation, and topsoil from the designated area.
- Excavation:
- Sunken Pit: Excavate to the required depth, accounting for the base material (gravel, sand), the structural walls, and the finished seating height. Ensure the bottom is level.
- Raised Pit: Excavation is minimal, primarily for the footing of the retaining walls.
- Drainage: This is paramount to prevent water accumulation and structural damage.
- Slope: Gently slope the base of the pit (e.g., 1/8 inch per foot) towards a drainage point.
- Gravel Base: Lay down 6-12 inches of compacted gravel (e.g., 3/4 inch crushed stone) as a permeable base.
- Perforated Pipe: Install a perforated drain pipe (French drain) along the lowest edge or around the perimeter of a sunken pit, directing water away from the area to a suitable discharge point (e.g., dry well, storm drain, or natural slope). Wrap the pipe in landscape fabric to prevent clogging.
2. Building the Bench Structure: Strength and Comfort
The built-in seating is the backbone of your conversation pit. Its construction needs to be solid.
- Footings: For permanent, heavy structures (stone, concrete block), proper footings below the frost line are essential in colder climates to prevent shifting and cracking from freeze-thaw cycles. Consult local building codes for specific requirements.
- Retaining Walls:
- Materials: Use concrete blocks, solid masonry units, or natural stone for the core structure. These provide excellent structural support.
- Construction: Lay blocks or stone with mortar on a strong, level foundation. Ensure walls are plumb and level. For walls over 2 feet high, consider reinforcing with rebar and concrete infill for added stability.
- Veneer/Facing: Once the structural walls are built, apply your chosen decorative finish – whether it’s stucco, natural stone veneer, or manufactured stone.
- Seating Surfaces:
- Concrete Capstones: Widely used for bench tops, offering a clean, modern look. Can be poured in place or pre-fabricated.
- Natural Stone Slabs: Offer a premium finish but can be heavier and more expensive.
- Wood/Composite Decking: For a warmer seat, attach a frame to the top of the masonry wall and overlay with weather-resistant wood (cedar, redwood, ipe) or composite decking boards. Ensure proper fastening and ventilation.
- Backrests: If desired, backrests can be integrated into the wall design or added as separate wooden or metal structures affixed to the main seating.
3. Fire Pit Installation: Safety First
Whether wood or gas, proper installation is non-negotiable for safety.
- Wood-Burning Pit:
- Liner: Use a fire-resistant steel or refractory block liner within the stone/block structure to protect the masonry from intense heat.
- Ventilation: Ensure adequate air circulation at the base for a good burn.
- Spark Arrestor/Screen: Essential for safety, especially in wooded areas.
- Ash Collection: Design for easy ash removal.
- Gas Fire Pit:
- Burner Components: Purchase a high-quality stainless steel burner pan and ring specifically designed for outdoor fire pits.
- Gas Line Installation: This must be done by a licensed plumber or gas technician. Ensure proper sizing, shut-off valves, and pressure testing.
- Ignition System: Choose between manual ignition (key valve) or electronic ignition for convenience.
- Media: Fill the burner pan with lava rock or fire glass.
- Ventilation: Gas fire pit enclosures require proper ventilation holes (two opposing sides, near the bottom) to prevent gas buildup.
- Clearances: Always adhere to manufacturer guidelines for the fire pit components and local fire codes for clearances to combustibles.
4. Finishing Touches: Paving, Lighting, and Landscaping
These elements complete the space, enhancing functionality and beauty.
- Paving (Surrounding Area): Install a durable, slip-resistant surface around the pit. Pavers, concrete, flagstone, or gravel are popular choices. Ensure proper grading for drainage away from the pit.
- Lighting:
- Accent Lighting: Low-voltage LED strip lights under bench caps or path lighting along walkways can provide subtle illumination and enhance the ambiance.
- Task Lighting: Maybe minimal, but consider if any specific task lighting is needed.
- Safety Lighting: Ensure all steps and transitions are well-lit.
- Landscaping:
- Plant Selection: Choose plants that complement the hardscaping and are suitable for your climate. Consider fire-resistant plants near the pit.
- Privacy: Use taller shrubs or trees to create natural screens.
- Aroma: Incorporate fragrant plants like lavender or rosemary that release pleasant scents as guests approach.
By investing time and care in each of these construction phases, you ensure your outdoor conversation pit with built-in seating is not just beautiful, but also safe, durable, and a lasting source of enjoyment.
Furnishing & Accessorizing: Elevating Comfort and Style
Once the stone and fire are in place, it’s time to bring your outdoor conversation pit to life with elements that enhance comfort, function, and aesthetic appeal. These are the soft touches that transform a structure into a truly inviting sanctuary.
1. The Essential Role of Outdoor Cushions and Pillows
Built-in stone or concrete seating systems are incredibly durable, but they’re not inherently soft. High-quality outdoor cushions and throw pillows are non-negotiable for comfort.
- Fabric Choice: Opt for weather-resistant fabrics like Sunbrella, Agora, or other solution-dyed acrylics. These are UV-resistant, fade-proof, water-repellent, and easy to clean.
- Foam Density: Look for high-density, quick-drying outdoor foam. This prevents waterlogging and mildew, ensuring cushions dry quickly after rain.
- Size and Fit: Custom cushions often fit built-in benches best, ensuring a tailored look. Measure carefully!
- Color and Pattern: Cushions offer a fantastic opportunity to inject personality. Choose colors that complement your hardscaping and existing home color scheme, or use vibrant patterns for a pop of energy.
- Storage: Plan for off-season or inclement weather storage. A weatherproof deck box nearby is an excellent solution for keeping cushions dry and clean.
2. Thoughtful Lighting Beyond the Fire: Ambiance and Safety
While the fire provides a warm glow, strategic layering of additional lighting enhances both ambiance and safety.
- Low-Voltage LED Strip Lighting: Installing LED strips beneath bench caps or along steps creates a stunning, subtle glow that highlights architectural features and prevents trip hazards. These are energy-efficient and long-lasting.
- Path Lights: If your conversation pit is set away from the main patio, well-placed path lights guide guests safely to and from the area.
- Uplighting for Landscaping: Use small spotlights to illuminate surrounding trees or plantings, adding depth and drama to the nightscape.
- String Lights: Overhead string lights (café lights, bistro lights) can create a festive, intimate canopy above the pit, perfect for parties.
- Lanterns and Candles: For an extra layer of soft, flickering light, incorporate decorative outdoor lanterns or flameless LED candles on nearby side tables or ledges.
Remember to consider dimmable options for ultimate control over the mood.
3. Functional Furnishings: Tables and Storage
Even with built-in seating, a conversation pit benefits from a few key pieces of mobile furniture.
- Side Tables: Small, sturdy outdoor side tables are essential for holding drinks, snacks, or a mobile phone. Concrete, metal, or weather-resistant wood tables work well.
- Coffee Table/Ottoman: A central outdoor coffee table can serve as a place for serving food, playing games, or simply resting weary feet. Look for dual-purpose options with hidden storage.
- Storage Boxes: As mentioned, a dedicated storage box for cushions, blankets, and fire pit accessories keeps the area tidy and protected. Choose a weatherproof model that fits your aesthetic.
4. Privacy and Shade Solutions: Enhancing the Retreat
Sometimes, even the most private backyard needs a little extra help. Consider these options:
- Pergolas or Awnings: A pergola above the conversation pit can provide partial shade and a framework for climbing plants or string lights. A retractable awning offers flexible shade on demand.
- Privacy Screens: Decorative metal screens, slatted wood panels, or even espaliered plants can create visual barriers from neighbors without completely enclosing the space.
- Strategic Planting: Tall, dense shrubs or bamboo (in contained planters) can offer natural privacy and block undesirable views.
- Outdoor Curtains: If your conversation pit is part of a larger covered patio, outdoor curtains can provide privacy, shade, and
a touch of elegance.
The right combination of comfort, lighting, and functional accessories will transform your outdoor conversation pit with built-in seating into the most sought-after spot in your home.
Maintaining Your Outdoor Conversation Pit with Built-In Seating
A beautiful outdoor conversation pit with built-in seating is a significant investment, and like any investment, it requires ongoing care to maintain its appeal and functionality. Regular maintenance ensures longevity, cleanliness, and continued enjoyment.
1. Routine Cleaning: Keeping it Pristine
Outdoor elements inevitably lead to dirt, dust, and debris. Regular cleaning keeps your pit looking its best.
- Sweeping/Blowing: Weekly or as needed, sweep or use a leaf blower to remove leaves, dirt, and general debris from the seating surfaces and the surrounding ground.
- Wiping Surfaces: Periodically wipe down stone, concrete, or wood surfaces with a damp cloth to remove grime. For tougher stains, use a mild soap (like dish soap) and water solution. Always test in an inconspicuous area first.
- Cushion Care:
- Brush off loose dirt regularly.
- Spot clean soiled areas with a mild soap solution and a soft brush. Rinse thoroughly and allow to air dry completely before storing or putting back.
- For tougher stains, follow the cleaning instructions provided by the cushion manufacturer (e.g., Sunbrella’s specific cleaning recommendations).
- Store cushions indoors or in weatherproof containers when not in use or during prolonged bad weather.
- Fire Pit Cleaning:
- Wood-Burning: Once completely cool, scoop out ash regularly. An ash vacuum can make this task easier. Wipe down the fire ring interior as needed.
- Gas: Ensure the unit is off and cool. Clean lava rocks or fire glass of any debris. Gently wipe down the burner pan and ring with a damp cloth. Check for any blockages in the burner ports.
2. Seasonal Maintenance: Protecting Your Investment
Depending on your climate, seasonal tasks will be crucial for preserving your conversation pit.
- Spring Check-up:
- Inspect all masonry for loose mortar, cracks, or shifting. Address small issues proactively.
- Check wood or composite seating for signs of wear, splintering, or loose fasteners.
- Clean out drainage systems (perforated pipes, gravel bases) to ensure they are free from debris and functioning correctly.
- Verify gas lines for leaks (using a soap solution on fittings) and check ignition systems.
- Fall Shut-down (Winterizing):
- Perform a thorough cleaning of all components.
- Drain and remove any water from gas lines or igniters if specified by the manufacturer for cold climates.
- Store cushions and any portable accessories indoors.
- Consider covering the entire conversation pit with a custom-fit, waterproof cover if you live in an area with harsh winters. This protects surfaces from snow, ice, and prolonged moisture.
- For wood-burning pits, ensure all leftover wood and ash are removed.
3. Addressing Common Issues: Quick Fixes and When to Call a Pro
Knowing when to handle a small repair yourself versus calling a professional can save money and prevent larger problems.
- Minor Cracks in Mortar/Concrete: Small hairline cracks can often be sealed with a masonry caulk or sealant. Larger, structural cracks require professional assessment.
- Stains on Stone/Concrete: Use specialized masonry cleaners for efflorescence (white powdery deposits) or rust stains. Always follow product instructions and wear protective gear.
- Wood Fading/Weathering: Reapply stains or sealants to natural wood seating every 1-3 years as needed. Composite decking typically requires only cleaning.
- Drainage Issues: If water isn’t draining, check if the perforations in the drain pipe are blocked or if the gravel base is compacted. This might require digging up a section to clear. Persistent issues may indicate an underlying grading problem needing professional help.
- Gas Fire Pit Malfunctions: If the burner isn’t lighting, the flame is weak, or you smell gas, immediately turn off the gas supply and call a licensed gas technician. Do not attempt DIY repairs on gas lines.
By establishing a consistent maintenance routine, you’re not just cleaning; you’re preserving the beauty and functionality of your outdoor conversation pit with built-in seating for years of enjoyment. Small efforts now prevent big problems later.
Inspiring Ideas & Case Studies: Realizing Your Outdoor Vision
Sometimes, the best way to spark creativity is to see what others have accomplished. Let’s explore a few inspiring concepts for outdoor conversation pits with built-in seating and discover how these designs address unique needs and styles.
1. The Modern Minimalist Retreat: Clean Lines and Subtle Elegance
Concept: A rectangular, slightly sunken conversation pit built from smooth, dark gray concrete. The built-in seating is a continuous, L-shaped bench, capped with a sleek, polished concrete slab. The fire feature is a linear, gas-burning trough filled with black fire glass, controlled by an electronic igniter.
Why it works: This design emphasizes clean lines and a monochromatic palette, integrating seamlessly with contemporary architecture. The sunken nature provides a cozy feel, while the gas fire offers instant ambiance without the mess of wood. Integrated LED strip lighting under the bench caps provides a dramatic evening glow. Surrounding the pit is a bluestone patio, further enhancing the modern aesthetic.
Key Design Takeaway: Simplicity can be profoundly impactful. Focus on high-quality materials and precise construction for a sophisticated, understated look.

2. Rustic Hillside Haven: Natural Stone and Earthy Charm
Concept: A circular, terraced conversation pit nestled into a hillside, constructed from local fieldstone. The built-in seating follows the circular form, creating a deep, embracing space. The central fire pit is a large, wood-burning ring lined with fire-rated bricks, set at ground level.
Why it works: This pit feels like it grew organically from the landscape. The natural stone blends seamlessly with the environment, creating a sense of timelessness. The wood-burning fire adds an authentic, rustic charm and comforting aroma. The terraced design handles the sloped terrain gracefully, turning a challenge into a unique feature. Outdoor lanterns hang from nearby trees, supplementing the firelight.
Key Design Takeaway: Embrace your landscape. Use local materials and natural forms to create a space that feels deeply connected to its surroundings.

3. Family-Friendly Oasis: Durability, Comfort, and Fun
Concept: A large, U-shaped conversation pit built with durable concrete blocks, finished with a stucco veneer in a warm cream color. The built-in seating includes deep benches, topped with UV-resistant composite decking for comfort without sharp edges. The centerpiece is a large, square gas fire pit with a child-safe glass barrier. The area is surrounded by artificial turf for soft landings and easy maintenance.
Why it works: Safety and family comfort are paramount here. The smooth stucco and composite decking are forgiving, and the glass barrier around the fire adds an extra layer of protection for young children or pets. The U-shape allows for easy flow and access, while the durable materials ensure it can withstand active family life. A nearby outdoor storage chest holds blankets and games.
Key Design Takeaway: Functionality doesn’t mean sacrificing style. Integrate safety features and durable materials creatively for an enjoyable space for all ages.

4. Urban Rooftop Retreat: Maximizing Small Spaces
Concept: A compact, square outdoor conversation pit designed for a rooftop deck. The built-in seating is a solid concrete block structure, faced with lightweight, pre-fabricated slate panels. The benches are shallow to save space but accommodate custom-fit, plush outdoor cushions. A small, eco-friendly ethanol fire pit sits centrally on a low, robust coffee table.
Why it works: This design cleverly addresses the challenges of a rooftop: weight restrictions, limited space, and wind. Lightweight materials and a compact footprint make it suitable for urban environments. The ethanol fire pit provides flame without requiring gas lines. Strategic planting in lightweight planters adds greenery and helps soften the hard edges, creating a cozy urban escape.
Key Design Takeaway: Creativity thrives in constraint. Even small or challenging spaces can yield beautiful, functional outdoor conversation pits with thoughtful material choices and compact design.

These case studies illustrate that with careful planning and an understanding of materials and design principles, an outdoor conversation pit with built-in seating can be tailored to virtually any aesthetic, function, and environment. Let these examples inspire your own unique backyard masterpiece.
Comparison: Wood vs. Gas Fire Pits for Your Conversation Pit
Choosing between a wood-burning and a gas-burning fire pit is a pivotal decision that impacts maintenance, ambiance, and cost. Each has distinct advantages.
| Feature | Wood-Burning Fire Pit | Gas-Burning Fire Pit (Natural Gas/Propane) |
|---|---|---|
| Ambiance | Authentic crackle, smoky aroma, traditional campfire feel. Primal and engaging. | Clean burn, controlled flame, modern aesthetic. Can use fire glass or lava rock. |
| Convenience | Requires sourcing/storing wood, tending the fire, and ash cleanup. Slower to start/stop. | Instant on/off with a switch or remote. No wood storage or ash cleanup. Very convenient. |
| Heat Output | Can throw significant heat, especially from larger logs. Heat intensity varies. | Consistent, controllable heat. Generally provides less radiant heat than a large wood fire. |
| Fuel Source | Seasoned firewood. Can be messy. | Natural gas (plumbed) or propane (tank). Propane tanks need refilling/exchanging. |
| Installation Cost | Generally lower for the pit itself (excluding masonry). No gas lines needed. | Higher initial cost due to burner components, gas lines, and professional installation. |
| Operating Cost | Cost of wood (can vary locally). | Cost of natural gas or propane. Varies by usage and local rates. |
| Maintenance | Regular ash removal, occasional cleaning of the firebox. | Minimal cleaning of burner and media. Annual professional inspection recommended for gas lines. |
| Safety Concerns | Sparks, smoke, embers. Requires vigilant supervision. Risk of fire spread. | Potential for gas leaks, carbon monoxide. Requires proper installation and ventilation. |
| Permits | Often requires permits and adherence to local fire codes for clearances. | Almost always requires permits for gas line installation and fire feature. |
Your choice will largely depend on your desired experience, local regulations, and willingness to manage the ongoing tasks associated with each type. For those who love the traditional campfire experience, wood is king. For convenience, cleanliness, and modern aesthetic, gas is the hands-down winner.
FAQ: Your Questions Answered About Outdoor Conversation Pits
What is the ideal distance from my house for an outdoor conversation pit?
An outdoor conversation pit with built-in seating should typically be positioned at least 10-15 feet away from any combustible structures, including your home, fences, sheds, and overhanging tree branches. Always check with your local municipality’s building and fire codes, as minimum setback requirements can vary significantly by location and fire pit type (wood-burning vs. gas). Some areas may have stricter rules for wood-burning pits due to spark risks.
Can I convert an existing patio into a conversation pit?
Yes, it’s often possible to convert a portion of an existing patio into an outdoor conversation pit with built-in seating. This usually involves defining a section, building raised seating walls around the designated area, and integrating a fire feature. For a sunken pit, you might need to cut and excavate the existing patio, which can be more complex and costly. Proper drainage and structural integrity for the new seating walls will be key considerations.
What’s the best material for built-in seating comfort?
While stone and concrete are common for the structural elements of built-in seating due to their durability, they are not inherently comfortable. The best practice is to top these hard surfaces with high-quality, weather-resistant outdoor cushions. For the bench tops themselves, composite decking or weather-resistant hardwoods like teak offer a warmer, softer feel than stone or concrete, even without cushions, and are more forgiving if they get hot or cold.
How do I ensure proper drainage for a sunken conversation pit?
Proper drainage is crucial for sunken outdoor conversation pits. Start by sloping the base of the pit slightly (e.g., 1/8 inch per foot) towards a designated drainage point. Lay down a substantial gravel base (6-12 inches of compacted crushed stone) for porosity. Most importantly, install a perforated drain pipe (French drain) covered in landscape fabric along the lowest perimeter or point within the pit, directing water away to a dry well, storm drain, or a natural downhill slope on your property.
Is DIY construction feasible for an outdoor conversation pit?
Feasibility depends on your skill level, the complexity of the design, and local regulations. A simple, raised conversation pit using pre-fabricated concrete blocks and a drop-in fire pit kit might be a DIY project for an experienced homeowner. However, complex designs, sunken pits requiring extensive excavation and drainage, gas line installation, or natural stone masonry typically require professional expertise from landscape designers, masons, and licensed contractors or plumbers to ensure structural integrity, safety, and compliance with codes.
What are the key safety considerations for outdoor fire pits?
Key safety considerations include maintaining adequate clearance (at least 10-15 feet) from combustible structures and vegetation. For wood-burning pits, always use a spark arrestor or screen, never leave the fire unattended, and have a water source nearby. For gas pits, ensure professional installation of gas lines and check for proper ventilation around the burner enclosure. Always use your fire pit on a stable, non-combustible surface, and never use accelerants. Review and adhere to all local fire codes and manufacturer guidelines.
How much maintenance do outdoor conversation pits require?
The maintenance level varies with materials and fire type. Generally, built-in conversation pits require regular sweeping or blowing to remove debris, occasional wiping or washing of surfaces, and seasonal care. Wood-burning pits need ash removal. Gas pits need less cleaning but professional gas line inspections are essential. Cushions and covers need cleaning and storage. Overall, built-in structures are lower maintenance than constantly replacing outdoor furniture, but consistent upkeep prevents long-term damage and keeps the space inviting.
Do I need a permit for an outdoor conversation pit with built-in seating?
In most cases, yes, you will likely need permits. Permanent structures, especially those involving excavation, masonry construction, and utility connections (like gas lines for fire pits), almost always require permits from your local building department. Additionally, there may be specific fire safety permits or zoning approvals required. Always contact your local municipality and HOA (if applicable) before starting any work to understand their specific requirements and avoid potential fines or project delays.
Conclusion: Your Backyard Transformation Awaits
Designing an outdoor conversation pit with built-in seating is more than just a home improvement project; it’s about crafting a dedicated space for connection, relaxation, and lasting memories. We’ve journeyed through the entire process, from the initial spark of an idea to the finishing touches, covering everything from critical site selection and material choices to construction essentials and ongoing maintenance. You now understand the magnetic appeal, the functional benefits, and the significant boost in property value such a feature can bring. It’s clear that with careful planning and an eye for detail, your vision of a stunning backyard oasis is entirely achievable.
Remember, the best outdoor conversation pits are those that seamlessly blend with your home’s aesthetic, function flawlessly for your lifestyle, and most importantly, invite you and your loved ones to gather, unwind, and enjoy the beauty of the outdoors. The satisfaction of sitting around a crackling fire, surrounded by the comfort of your custom-built seating, is truly unparalleled.
Ready to Create Your Outdoor Masterpiece?
Take the next step towards your dream backyard:
- Sketch Your Vision: Start by drawing out your ideas, considering size, shape, and desired features.
- Consult Local Regulations: Contact your local planning department and HOA to understand permits and codes.
- Gather Inspiration: Browse Houzz or Pinterest for design concepts that resonate with you.
- Seek Professional Advice: For complex designs or gas line installations, connect with experienced local landscape contractors or designers. A great resource for finding vetted professionals is the National Association of Landscape Professionals.
Your ultimate outdoor conversation pit with built-in seating isn’t just a dream; it’s a tangible reality waiting to be built. Embrace the journey, and prepare to enjoy countless serene evenings and lively gatherings in your spectacular new outdoor living space.
Content Disclaimer
The information provided in this article regarding designing and building outdoor conversation pits with built-in seating is intended for general informational and educational purposes only. While we strive to provide accurate and up-to-date content, it is not a substitute for professional advice. Building and fire codes, zoning ordinances, and local regulations vary significantly by location and change over time. Before undertaking any construction project, especially one involving fire, excavation, or permanent structures, it is essential to consult with local governmental authorities, homeowners associations, and qualified professionals such as licensed contractors, landscape architects, plumbers, and electricians. This guide does not constitute professional design, construction, or safety advice. The author and publisher disclaim any liability for any personal injury, property damage, or other loss suffered as a result of using or relying on the information presented herein. Always prioritize safety and compliance with local laws.