DIY Budget Friendly Outdoor Lighting: Illuminate Your Space Without Breaking the Bank
The sun dips below the horizon, and your vibrant garden, cozy patio, or inviting porch suddenly vanishes into the night. Sound familiar? Many homeowners dream of transforming their outdoor spaces into magical havens after dusk, but the thought of expensive electricians, high-end fixtures, and soaring electricity bills often puts those dreams on hold. What if we told you that stunning, atmospheric outdoor lighting doesn’t have to drain your wallet?
This comprehensive guide dives deep into the world of DIY budget friendly outdoor lighting. We’re talking about clever, creative, and cost-effective ways to bring warmth, security, and elegance to your exterior – all while keeping those hard-earned dollars in your pocket. Forget generic solutions; we’ll empower you to craft personalized lighting designs that reflect your style and enhance your home’s curb appeal, often with materials you already have or can find for a steal.
From upcycled treasures to smart solar solutions, you’ll learn the secrets to creating dazzling outdoor illumination. We’ll cover everything from planning your perfect lighting scheme to step-by-step project guides, ensuring you gather all the knowledge needed to turn your outdoor aspirations into illuminated realities. Get ready to banish the darkness and welcome a beautifully lit, budget-conscious outdoor oasis.
The Allure of Outdoor Lighting: Why It Matters (and How to Afford It)
Imagine a quiet evening on your patio, bathed in a soft, inviting glow. Or a pathway safely lit for guests, showcasing your landscaping even after dark. Outdoor lighting isn’t just about aesthetics; it’s a powerful tool that enhances security, extends living spaces, and even boosts property value. But traditionally, achieving this has meant significant investment. The good news? The rise of accessible DIY options means you no longer need a luxury budget to enjoy these benefits.
Many homeowners wrestle with a common dilemma: how to get that designer look without the designer price tag. The answer lies in ingenuity and a willingness to get a little hands-on. By understanding basic lighting principles and leveraging affordable materials, you can achieve professional-looking results for a fraction of the cost. Let’s explore the core advantages of a well-lit outdoor area:
- Enhanced Safety & Security: Well-placed lights deter intruders and prevent trips and falls on pathways or steps.
- Extended Living Spaces: Transform decks, patios, and gardens into usable areas even after sunset, perfect for entertaining or relaxation.
- Increased Curb Appeal: Highlight architectural features, landscaping, and entries, making your home more inviting.
- Atmosphere & Ambiance: Create specific moods – from festive and lively to tranquil and romantic – with different lighting techniques.
- Property Value Boost: Thoughtful outdoor lighting is a highly desirable feature for prospective buyers.
Our focus here is not just on *having* outdoor lights, but on having DIY budget friendly outdoor lighting that looks expensive without actually being expensive. It’s about smart choices, repurposing, and a touch of creativity.
Understanding Basic Outdoor Lighting Principles
Before diving into specific projects, it’s helpful to grasp a few fundamental concepts. Think of your outdoor space as a canvas, and light as your paint. You’re not just adding light; you’re painting with it. Here are key principles:
- Task Lighting: Bright, focused light for specific activities like grilling or working in a shed.
- Accent Lighting: Highlights specific features like a beautiful tree, a statue, or architectural details. Creates drama.
- Path & Step Lighting: Ensures safe passage, guiding visitors and illuminating potential hazards.
- Ambient Lighting: Provides a general, soft glow that defines the overall mood and fills the space. Think string lights or lanterns.
- Uplighting vs. Downlighting: Uplighting shines light upwards from the ground to highlight objects, while downlighting shines from above, often imitating moonlight or providing general area illumination.
By strategically combining these types, you can create a layered and dynamic lighting scheme that caters to all your outdoor needs and desires, all while maintaining a DIY budget friendly outdoor lighting approach.
Choosing the Right Power Source for Your DIY Outdoor Lights
One of the biggest factors influencing the cost and complexity of your DIY budget friendly outdoor lighting is the power source. Each option has its pros and cons, especially when considering ease of installation, energy consumption, and initial investment. Understanding these differences will help you make the smartest choices for your projects.

Solar-Powered Outdoor Lighting: The Ultimate Budget Saver
Solar lighting is arguably the easiest and most budget-friendly option for DIY enthusiasts. These lights harness the sun’s energy during the day via a small photovoltaic panel, storing it in an internal rechargeable battery. Come nightfall, a sensor automatically switches them on. Installation is typically as simple as staking them into the ground.
Pros of Solar Lighting:
- No Wiring Needed: Eliminates the need for electrical knowledge, trenches, or professional installation.
- Zero Electricity Cost: Runs entirely on renewable energy from the sun.
- Environmentally Friendly: Reduces your carbon footprint.
- Flexible Placement: Can be placed almost anywhere that receives adequate sunlight.
- Increasing Efficiency: Modern solar lights are brighter and last longer than older models.
Cons of Solar Lighting:
- Performance Varies: Output and duration depend on daily sunlight exposure. Shady areas are problematic.
- Battery Lifespan: Rechargeable batteries eventually degrade and need replacement (typically every 1-3 years).
- Brightness Limitations: Generally not as bright as wired options, making them best for accent or ambient lighting.
- Initial Cost: Individual units can be inexpensive, but outfitting an entire yard can still add up.
Recommendation: Ideal for pathways, garden accents, occasional patio lighting, or areas far from power outlets. Look for lights with amorphous silicon solar panels for better low-light performance, and ensure they have replaceable NiMH batteries for longevity.
Battery-Powered Outdoor Lights: Portable & Adaptable
If solar isn’t an option due to shade or specific needs, battery-powered lights offer similar flexibility without the sun requirement. These lights run on standard disposable batteries (AA, AAA, D cells) or larger rechargeable battery packs. They’re excellent for temporary setups or areas where constant light isn’t needed.
Pros of Battery Lighting:
- Extreme Portability: Easily moved and repositioned for events or changing needs.
- No Wiring Required: Just insert batteries and go.
- Consistent Brightness: Not dependent on sunlight, offering predictable output.
- Motion-Sensing Options: Many security lights are battery-powered, saving energy by only activating when needed.
Cons of Battery Lighting:
- Ongoing Battery Costs: Disposable batteries add up; rechargeable ones require regular charging.
- Environmental Impact: Disposable batteries contribute to waste.
- Limited Duration: Battery life can be short, especially with bright or constantly-on lights.
- Not for Permanent Illumination: Best for supplemental or temporary lighting.
Recommendation: Use for decorative lanterns on tables, temporary path markers, outdoor closets, or motion-activated security spots near doors where running wires is impractical. Consider rechargeable batteries and a smart charger to offset costs.
Low-Voltage Wired Lighting: A Step Up in Performance
Low-voltage wired lighting offers a significant upgrade in brightness and reliability compared to solar or battery options, while still being much safer and easier to install than standard household line voltage (120V) electricity. It uses a transformer to step down 120V power to 12V, which is then distributed via outdoor-rated cables.
The beauty of low-voltage systems for DIY budget friendly outdoor lighting is that they typically don’t require an electrician for installation in most areas (always check local codes!). The components are designed for homeowner-friendly setup, often using simple connectors. You run a single main cable from the transformer and tap individual lights into it.
Pros of Low-Voltage Lighting:
- Consistent, Bright Light: Reliable illumination regardless of sun exposure or battery life.
- Greater Versatility: Wider range of fixture types, wattages, and beam spreads available.
- Energy Efficient (LED): When paired with modern LED bulbs, operating costs are low.
- More Permanent Solution: Built to last and provide consistent lighting year-round.
- DIY Friendly: Safer and easier to install than high-voltage systems.
Cons of Low-Voltage Lighting:
- Initial Cost: Requires a transformer and outdoor-rated cable, increasing upfront investment.
- Installation Effort: Involves running cables and often burying them, which is more work than solar/battery.
- Limited Placement: Constrained by the power source and cable runs.
- Potential for Professional Help: If you’re uncomfortable with basic wiring or burying cables, professional installation might be considered (though often unnecessary for DIY setups).
Recommendation: Best for foundational landscape lighting – pathway lights, accent lights for trees, deck and patio lighting where a more powerful, continuous glow is desired. Look for LED options to keep running costs low. A good quality transformer is crucial for system longevity.
Tool Recommendation: For low-voltage wiring, a good pair of wire strippers, basic outdoor cable connectors (often included with kits), and a shovel for burying cables are essential. Home Depot’s guide to low-voltage lighting offers further insights into components.
Brilliant DIY Budget Friendly Outdoor Lighting Projects (Step-by-Step)
This is where the magic happens! We’ll walk you through several creative and cost-effective DIY budget friendly outdoor lighting projects that you can tackle this weekend. Each project focuses on using readily available, often repurposed materials to create unique and functional lighting elements.
Project 1: Mason Jar Solar Lanterns – Classic Charm, Zero Cost
Mason jars are a DIYer’s best friend. Combine them with inexpensive solar path light inserts, and you have instant, charming ambient lighting.
Materials Needed:
- Empty Mason jars (various sizes work well)
- Small solar path lights (the ones with a stake, often found in multi-packs)
- Wire or twine (optional, for hanging)
- Glass paint or frosted spray paint (optional, for diffusing light)
- Small decorative items: pebbles, sea glass, fairy lights (optional)
Instructions:
- Disassemble the Solar Light: Carefully remove the top cap of the solar path light. This usually contains the solar panel, battery, and LED light. Discard the stake.
- Fit to Mason Jar: The solar cap should sit snugly on the mouth of the Mason jar. If it’s a bit loose, a thin bead of silicone sealant around the rim of the jar can secure it and keep moisture out (ensure the solar panel itself is clear).
- Decorate (Optional): For a diffused glow, spray the inside of the jar with frosted glass paint. You can also add a layer of decorative pebbles or sea glass to the bottom of the jar for added weight and visual interest. Mini solar-powered fairy light strands can also be added inside before sealing.
- Seal & Hang/Place: Screw on the band of the Mason jar lid over the solar cap, ensuring a tight seal. For hanging, wrap wire around the neck of the jar or use twine to create a handle. Otherwise, simply place your new lantern on a table, steps, or along a path.
- Charge: Place your finished lanterns in a sunny spot for a full day to charge before their first use.
Cost Savings: Instead of buying expensive outdoor lanterns, you’re repurposing jars and using very cheap solar light components. The result is custom, charming, and truly DIY budget friendly outdoor lighting.

Project 2: Upcycled Tin Can Luminaries – Crafty & Captivating
Don’t toss those old coffee or vegetable cans! With a little creativity, they can become beautiful, patterned luminaries perfect for pathways or table accents. These work best with small tea lights, either traditional or battery-operated LED ones.
Materials Needed:
- Empty tin cans (various sizes, labels removed, washed)
- Hammer and various sized nails (or a drill with small bits)
- Thick towel or sand (to fill cans)
- Marker or stencil for designs
- Spray paint (optional, for exterior finish)
- Small tea lights (LED battery-operated recommended for safety and longevity)
Instructions:
- Prepare Cans: Wash and dry cans thoroughly. Remove paper labels. For easier punching and to prevent denting, fill the cans with water and freeze them solid overnight, or pack tightly with sand.
- Design Your Pattern: Use a marker or stencil to draw your desired pattern onto the can. Simple designs like stars, circles, or abstract patterns work best. You can also spell out words or create intricate scenes.
- Punch Holes: Place the can (frozen or sand-filled) on a stable, protected surface (like a piece of scrap wood). Using a hammer and nail, carefully punch holes along your design lines. Experiment with different nail sizes for varied light effects.
- Paint (Optional): Once all holes are punched and the ice has melted (or sand removed), dry the cans. If desired, spray paint the exterior of the cans in colors that complement your outdoor decor. Allow to dry completely.
- Illuminate: Place an LED tea light into each can. Arrange them along pathways, on steps, or group them on tables for a magical glow.
Safety Note: If using real flame tea lights, always place luminaries on a non-flammable surface, away from anything that could catch fire, and never leave unattended.
Project 3: String Light Planters – Elevated Ambiance
String lights are a staple for DIY budget friendly outdoor lighting, but how do you get them floating where you need them without permanent fixtures? Repurposed planters with posts are a clever solution.
Materials Needed:
- Outdoor string lights (solar-powered or low-voltage LED recommended)
- Two or more large planters (e.g., plastic half-whiskey barrels, large terracotta pots)
- Wooden posts or rebar (at least 6-8 feet tall)
- Quick-setting concrete or bags of gravel/heavy rocks
- Soil and plants (optional, for aesthetic finishing)
- Hooks or eye bolts
Instructions:
- Prepare Planters: Ensure your planters have drainage holes.
- Anchor Posts: Place a wooden post (or rebar) in the center of each planter. Pour quick-setting concrete around the post to hold it firmly in place. Alternatively, fill the planter with heavy gravel or rocks, compacting it around the post until it’s stable. Allow concrete to cure or ensure gravel is packed extremely tight.
- Add Hooks: Install a hook or eye bolt near the top of each post.
- String Lights: Drape your string lights between the posts, hooking them securely. You can create a straight line, an X-shape, or multiple diagonal lines, depending on your space. For longer spans, you might need more posts or attach one end to an existing structure (house, fence).
- Power Up: If using solar string lights, ensure the solar panel is positioned for maximum sun exposure. If low-voltage, connect to a weather-resistant outdoor outlet (use an outdoor-rated extension cord if necessary, or opt for battery-operated strings).
- Decorate (Optional): Once posts are stable, you can top the concrete/gravel with soil and plant flowers or small shrubs in the planters for a more integrated look. Just be mindful of watering around the post base if it’s wood.
Tip: For a more rustic look, use peeled branches as posts instead of finished lumber. This project is fantastic for defining a seating area or adding a festive touch to a patio.
Project 4: DIY Cinder Block Bench with Integrated Lighting
Cinder blocks are incredibly versatile and affordable building materials. With a bit of lumber, they can form the base of a stylish and DIY budget friendly outdoor lighting-integrated bench.
Materials Needed:
- Cinder blocks (amount depends on desired bench length, typically 6-8 per section)
- 4×4 or 4×6 lumber (pressure-treated for outdoor use, cut to bench length)
- Exterior-grade construction adhesive or landscape adhesive
- Outdoor string lights (fairy lights, rope lights, or small LED strips)
- Rechargeable battery pack for lights (if not solar or plug-in) or a simple solar panel for fairy lights
- Optional: Outdoor cushions, decorative stones, plants
Instructions:
- Plan Your Layout: Decide on the length and height of your bench. A common setup is stacking two cinder blocks high. Consider leaving some vertical holes open for lights.
- Level the Base: Prepare a flat, level area for your bench. Lay down your first layer of cinder blocks, ensuring they are perfectly level using a spirit level.
- Apply Adhesive: Run a bead of landscape adhesive along the top edges of the first layer of blocks.
- Stack Second Layer: Place the second layer of cinder blocks on top, staggering the pattern for stability (like brickwork). Press firmly into the adhesive.
- Integrate Lighting (Important Step!): Before placing the lumber top, thread your outdoor string lights (or LED strips) through some of the open holes in the top layer of cinder blocks. Aim to have lights peeking out strategically from the bench’s interior or ends. If using solar, ensure the small panel can be placed to catch sun. If battery-powered, hide the battery pack within an open block.
- Add Lumber Top: Place your 4×4 or 4×6 pressure-treated lumber pieces across the top of the stacked cinder blocks. These will form the seat. You can secure these by running additional adhesive along the top of the cinder blocks, or by drilling pilot holes and using long landscape screws into the blocks (though adhesive is often sufficient for stability).
- Finish & Decorate: Allow adhesive to cure. Add outdoor cushions for comfort. You can fill any remaining open cinder block holes with decorative stones or small, drought-tolerant plants for added visual appeal.
Versatility: This bench can serve as a seating area, a planter, and a discreet source of ambient light for your patio or garden. Its robust construction ensures longevity.
Project 5: DIY Driftwood or Branch Candle Holders/Light Stands
Nature provides some of the best DIY budget friendly outdoor lighting materials. Scavenge for interesting pieces of driftwood or sturdy branches to create unique, organic light stands.
Materials Needed:
- Attractive pieces of driftwood or sturdy, naturally fallen branches
- Drill with appropriate size bit (to fit candles or solar light inserts)
- Weather-resistant sealant (optional, for wood preservation)
- LED pillar candles or small solar path light inserts (as in Project 1)
- Stable base or heavy planter (if making a freestanding stand)
- Outdoor-rated clear epoxy (if bonding wood pieces)
Instructions:
- Clean & Prepare Wood: Thoroughly clean your driftwood or branches. Brush off loose debris, and if necessary, wash and allow to dry completely. If you want to preserve the wood and protect it from elements, apply a weather-resistant sealant.
- Determine Placement for Lights: Position your candles or solar light inserts onto the wood, marking where you want them to sit. Consider the natural curves and flat surfaces of the wood.
- Drill Holes/Cavities: Using a drill bit slightly smaller than your candle base or solar light insert, carefully drill shallow cavities into the wood. The goal is to create a snug fit so the lights sit securely. For solar lights, you might need to drill deeper to hide the base, leaving the solar panel exposed.
- Assemble & Stabilize (if freestanding): If creating a freestanding light stand, you may need to epoxy multiple pieces of wood together or secure a tall branch into a heavy planter filled with concrete or stones.
- Insert Lights: Place your LED pillar candles or solar light inserts into the drilled cavities.
- Position: Place your driftwood light stand on a patio table, near an entryway, or integrate it into a garden bed to highlight natural elements with a soft, warm glow.
Artistic Touch: Each piece of driftwood or branch will be unique, giving your lighting project a truly one-of-a-kind artistic flair that purchased fixtures can’t replicate.
Strategic Placement: Where to Put Your Budget Friendly Outdoor Lights
Having great DIY lights is one thing; knowing where to place them for maximum impact, safety, and ambiance is another. Strategic placement transforms simple lights into a cohesive and inviting outdoor nocturnal landscape. Think about the “zones” of your outdoor space and the purpose of lighting in each.
Entryways & Pathways: Safety and Welcome
The first impression of your home often happens at the entryway. Well-lit entrances and pathways are crucial for both safety and hospitality.
- Doorways: Use a combination of downlighting (e.g., a porch sconce or overhead fixture) and subtle accent lighting (like a small spotlight on a planter near the door) to clearly illuminate the entrance and lock.
- Steps: Each step leading to your door should be illuminated to prevent tripping. Recessed step lights (if you’re doing a more involved DIY project) or small solar path lights placed near the edge of each step are effective.
- Pathways: Solar path lights are ideal here for DIY budget friendly outdoor lighting. Place them evenly, about 6-8 feet apart, and slightly staggered on either side of the path to create overlapping pools of light and avoid a “runway” look. Aim for lights that shine downwards to minimize glare.
- Gardens along paths: If you have garden beds bordering paths, consider incorporating some of those tin can luminaries or mason jar lanterns to add visual interest and a soft glow without being overwhelmingly bright.
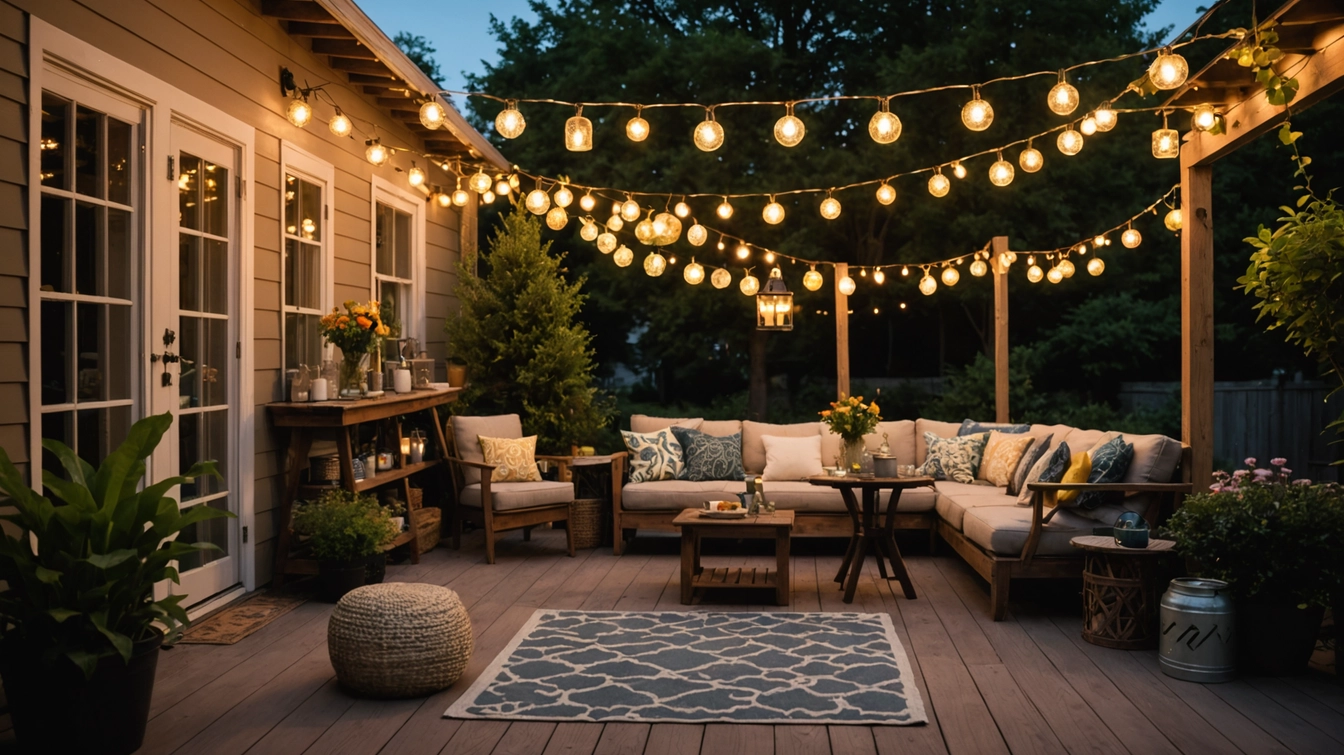
Patios & Decks: Extend Your Living Space
These are your outdoor living rooms! Lighting here should encourage relaxation, conversation, and dining.
- Ambient Overhead Lighting: String lights (like the planter project) are perfect. Drape them over your patio, pergola, or across your deck railings to create a starry canopy. Solar or low-voltage LED string lights are incredibly efficient.
- Tabletop Lighting: Mason jar lanterns, battery-operated candles, or small solar-powered fixtures add an intimate glow to dining or coffee tables.
- Deck Railings & Under Seating: Low-profile LED strip lights can be installed discreetly under deck railings or built-in benches to provide a soft, indirect glow that outlines the space. Many are self-adhesive and battery-operated.
- Grilling Area: A designated, brighter light for your grilling station is practical task lighting. A battery-operated motion sensor light or a solar spotlight aimed at the grill can be very effective.
Garden & Landscape Accents: Highlight Beauty
Showcase your favorite plants, trees, and water features even after dark. This is where accent lighting truly shines.
- Uplighting Trees: For small trees or interesting shrubs, a single solar spot light placed at the base and angled upwards creates dramatic shadows and highlights texture. For larger trees, consider a low-voltage spotlight.
- Highlighting Statues or Features: Position a solar spotlight a few feet away from the object, shining directly onto it. Vary the distance and angle for different effects.
- Flower Beds: Small, diffused solar garden lights can add a whimsical sparkle to flower beds without overpowering the natural beauty.
- Water Features: While specialized underwater lighting exists, even a small weatherproof solar light placed strategically next to a fountain or pond can create beautiful reflections and add a sense of peace.
Tips for Effective Placement:
- Layer Your Lighting: Combine ambient, task, and accent lighting for a dynamic and functional space.
- Avoid Glare: Ensure light sources aren’t shining directly into people’s eyes. Shield bulbs or use lights that cast a downward glow.
- Create Depth: Place lights at varying heights and distances to give your outdoor space dimension.
- Test and Adjust: The best way to know if your lighting works is to try it out after dark. Be prepared to move lights around until you achieve the desired effect.
Smart Choices: Materials, Maintenance & Energy for Budget Lighting
Creating DIY budget friendly outdoor lighting isn’t just about the initial build; it’s also about making smart choices for long-term savings in materials, energy consumption, and maintenance. Durability and efficiency are key to true budget-friendliness.
Selecting Durable and Affordable Materials
When choosing materials for your DIY lighting projects, prioritize those that can withstand outdoor conditions. This often means materials that are naturally weather-resistant or can be easily treated.
- Repurposed Glass: Mason jars, old wine bottles (when carefully cut and sanded), and other glass containers are excellent. Glass is naturally waterproof and enduring.
- Tin & Metal: Galvanized steel, aluminum, and even tin cans (when adequately painted or sealed) offer rust resistance. Paint provides an extra layer of protection.
- Pressure-Treated Wood: For any wooden components (posts for string lights, bases for lanterns), pressure-treated lumber or naturally rot-resistant woods like cedar or redwood are essential. Sealants further extend their life.
- Plastic/Resin: While often initially inexpensive, ensure outdoor-rated plastics are UV-stabilized to prevent brittleness and fading over time.
- Outdoor-Rated Electrical Components: For low-voltage projects, always use cables, connectors, and splice kits specifically designed for outdoor, direct-burial use. This is non-negotiable for safety and longevity.
Cost-Saving Tip: Keep an eye out at thrift stores, garage sales, and even construction waste sites (with permission!) for unique containers or materials that can be repurposed. One person’s trash is your next brilliant light fixture!
Maximizing Energy Efficiency (and Saving Money!)
The “budget friendly” aspect extends beyond initial material costs to ongoing operating expenses. Modern lighting technology offers incredible efficiency.
- LED is King: For any form of outdoor lighting – solar, battery, or low-voltage – choose LED bulbs or fixtures. They consume up to 90% less energy than traditional incandescent bulbs, last exponentially longer (tens of thousands of hours), and produce less heat.
- Solar: While initial solar lights might not provide the brightest output, they are completely free to operate. Ensure your solar panels are clean and perfectly positioned for maximum sun exposure.
- Timers & Sensors: Install inexpensive outdoor mechanical or digital timers for plug-in low-voltage systems. This ensures lights are only on when needed. Motion sensors are fantastic for security lights, activating only when movement is detected, saving significant power.
- Rechargeable Batteries: For battery-powered DIY lights, invest in good quality rechargeable NiMH batteries and a smart charger. This drastically reduces the continuous cost and environmental impact of disposable batteries.
Case Study: Solar vs. Incandescent Pathway Lights
A typical 60-watt incandescent bulb running 6 hours a night costs around $13 per year to operate (at $0.10/kWh). An equivalent brightness LED bulb might cost $1.50 per year. A solar light? $0. The savings are clear, especially when multiplied across multiple fixtures. This makes LED and solar key components of truly DIY budget friendly outdoor lighting.
Essential Maintenance for Longevity
Even DIY lights need a little love to perform their best and last through the seasons.
- Regular Cleaning: Wipe down solar panels, light covers, and fixture surfaces every few months to remove dirt, dust, and grime that can reduce light output.
- Battery Check: For solar lights, plan to replace the rechargeable batteries every 1-3 years. For battery-powered lights, replace or recharge as needed.
- Wiring & Connection Checks: For low-voltage systems, periodically inspect wires for damage (from critters, gardening tools). Ensure all connections are tight and corrosion-free. Use dielectric grease on connections for added protection.
- Fixture Stability: Re-stake path lights that have become loose. Ensure hanging lanterns or string lights are securely fastened, especially before windy weather.
- Pruning: Trim back any overgrown plants that might be blocking light output or solar panel exposure.
- Weather Protection: During extreme weather (heavy snow, very high winds), consider bringing in delicate DIY lights or securing them extra well. Consider applying a clear outdoor sealant to wooden components annually.
A little proactive maintenance goes a long way in ensuring your homemade outdoor lights continue to shine brightly and save you money for years to come.
Troubleshooting Common DIY Outdoor Lighting Issues
Even the most meticulously crafted DIY budget friendly outdoor lighting can encounter a hiccup or two. Don’t let a flickering light or a non-starter dim your enthusiasm! Most common issues are easily diagnosed and fixed.
Why Aren’t My Solar Lights Working?
This is a frequent complaint, but often the solution is simple.
- Lack of Sunlight: The most common culprit. Are they in a spot that gets at least 6-8 hours of direct, unobstructed sunlight daily? Overhanging branches or new construction can gradually create shade.
- Dirty Solar Panel: A layer of dust, pollen, or grime can drastically reduce the panel’s ability to charge. Wipe it clean with a damp cloth.
- Dead Battery: Rechargeable batteries in solar lights typically last 1-3 years. If your lights are old, try replacing the NiMH battery (usually AA or AAA sized, check wattage).
- Sensor Malfunction: The light-sensitive sensor (photocell) might be dirty or obstructed. Clean it. Also, ensure there isn’t another light source nearby (e.g., a street lamp, house window light) that’s tricking the sensor into thinking it’s still daytime.
- Internal Wiring Issue: Less common, but check for loose wires if you’re comfortable opening the unit.
Why is My Low-Voltage System Not Lighting Up?
Troubleshooting wired systems requires a bit more systematic checking.
- No Power to Transformer: Is the transformer plugged in? Is the outlet working (test with another appliance)? Check the circuit breaker.
- Faulty Transformer: If the transformer itself isn’t operating (no indicator lights, buzzing, etc.), it might be damaged.
- Loose or Corroded Connections: This is a very common issue. Carefully inspect every connection point between the main cable and each fixture. Dirt, moisture, or improper splicing can interrupt the circuit. Re-make connections if necessary, using outdoor-rated connectors.
- Damaged Cable: Has the cable been cut or chewed by animals? Visually inspect the entire run. If a break is found, you can splice it using a waterproof cable connector kit.
- Burned-Out Bulbs/Faulty Fixtures: Test individual bulbs or fixtures. If one bulb is out, replace it. If an entire fixture isn’t working, try swapping it with a known working one to isolate the problem. (Remember, LEDs have very long lifespans, but even they can fail eventually).
- Overloaded Transformer: Make sure the total wattage of all your lights doesn’t exceed the capacity of your transformer. If you’ve added too many lights, the transformer might shut down as a safety measure.
Why Are My Battery-Powered Lights Dim or Not Lasting?
Similar to solar, this usually comes down to the power source.
- Low Batteries: Replace disposable batteries or recharge rechargeable ones.
- Incorrect Battery Type: Ensure you’re using the correct voltage and type of battery specified by the manufacturer.
- Cold Weather: Batteries perform less efficiently in very cold temperatures, causing dimming or reduced operating time.
- Moisture Intrusion: If the battery compartment isn’t properly sealed, moisture can corrode terminals and affect performance. Dry out the compartment and clean terminals if necessary.
General Troubleshooting Tip: Always start with the simplest solutions. Check power first, then connections, and then individual components. Patience and a methodical approach will save you time and frustration, keeping your DIY budget friendly outdoor lighting shining brightly.
Beyond the Basics: Advanced DIY Lighting Concepts
Once you’ve mastered the fundamental DIY budget friendly outdoor lighting projects, you might be ready to explore more advanced techniques to truly customize and automate your outdoor illumination. These concepts add sophistication without necessarily breaking the bank.
Smart Lighting Integration: Control from Your Phone
The world of smart home technology has made outdoor lighting more convenient and versatile. While some smart outdoor systems can be pricey, you can integrate smart controls into your DIY setup affordably.
- Smart Outdoor Plugs: For plug-in string lights or low-voltage transformers, an outdoor-rated smart plug is a game-changer. These plugs connect to your home’s Wi-Fi and allow you to control your lights via a smartphone app, set schedules, or even integrate with voice assistants. They cost around $20-$30 each.
- Wi-Fi RGB LED Strips: Affordable, outdoor-rated RGB (red, green, blue) LED strips can be found online. These allow you to change colors, dim, and set patterns from your phone, perfect for festive occasions or creating dynamic accents.
Use Case: Imagine setting your patio string lights to come on automatically at sunset during summer, or changing your container garden lighting to festive red and green for the holidays, all with a tap on your phone.
Creative Diffusion and Light Sculpting
The type of fixture isn’t just about where the light comes from, but how it’s shaped and diffused. You can achieve stunning effects with simple modifications.
- Frosted Glass & Acrylic: Spraying the inside of a Mason jar or other glass container with frosted glass spray paint (as mentioned in Project 1), or using translucent acrylic sheets in a custom fixture can soften harsh light and create a beautiful, ethereal glow.
- Perforated Metals: Using perforated metal sheets (cheaply found at hardware stores or repurposed from old grates) to encase lights creates intricate shadow patterns on nearby surfaces. Think of it as a DIY gobo projector!
- Natural Materials: Weaving small LED fairy lights into grapevine wreaths, decorative branches, or bamboo screens introduces organic textures and filters light in unique ways.
- Color Filters: For specific mood lighting (e.g., warm amber for a cozy fire effect, cool blue for a nighttime pool ambience), you can experiment with colored gels (often used in theater lighting, but small sheets are cheap) over individual light sources.
Motion Activation for Security and Convenience
Adding motion sensors to your DIY budget friendly outdoor lighting improves security and energy efficiency. You don’t need expensive security floodlights; smaller, strategically placed motion-activated lights can be highly effective.
- Battery-Operated Motion Lights: There are many affordable, compact battery-powered LED lights with integrated motion sensors. Place these near doors, gates, or dark corners. They’re quick to install and need no wiring.
- Motion Sensor Switches: For low-voltage systems, you can purchase an outdoor-rated motion sensor accessory that plugs into the transformer outlet or acts as an inline switch. This turns all connected lights on only when motion is detected.
Benefit: A sudden burst of light can startle potential intruders and notify you of activity around your home. Plus, it’s convenient for navigating dark areas when carrying groceries or taking out the trash.
Seasonal & Holiday Lighting Creativity
Your DIY skills truly shine during holidays. Instead of buying expensive, single-use decorations, adapt your existing DIY budget friendly outdoor lighting for seasonal flair.
- Halloween: Use the tin can luminaries with spooky patterns. Change the color of your smart LED strips to orange or purple. Add battery-operated “ghost” lighting inside your Mason jars.
- Christmas/Winter: Wrap solar string lights around wreaths or outdoor planters. Use colored LED bulbs in your low-voltage system. Decorate your string light posts with festive garlands.
- Spring/Summer: Brighten up your planter lights with vibrant floral arrangements. Use clear glass jars to showcase colorful fairy lights.
The beauty of DIY is that you can continually adapt and evolve your outdoor lighting scheme, making it a dynamic and ever-changing reflection of your personal touch. These advanced concepts simply build upon the foundational skills you’ve developed, allowing for greater creativity and functionality.
Frequently Asked Questions About DIY Budget Friendly Outdoor Lighting
What’s the cheapest way to light up my backyard?
The cheapest way to light up your backyard is often through repurposing and using solar power. Projects like DIY Mason jar solar lanterns, upcycled tin can luminaries with LED tea lights, or installing inexpensive solar path lights in bulk are extremely cost-effective. These options require minimal upfront investment and have zero ongoing electricity costs.
Do DIY outdoor lights last long?
The longevity of DIY outdoor lights depends heavily on the materials used, quality of components (especially batteries and LEDs), and proper construction for weather resistance. If you use durable outdoor-rated materials, weather-seal components, and conduct regular maintenance (like cleaning solar panels and changing batteries), your DIY lights can last for several years. LED components, in particular, offer exceptional lifespans.
Are low-voltage outdoor lights truly DIY friendly?
Yes, low-voltage outdoor lighting systems are generally very DIY friendly. Unlike high-voltage (120V) systems that typically require a licensed electrician, low-voltage systems operate at 12V through a transformer, making them much safer to install. Most kits feature simple push-in or clamp-on connectors for fixtures, and the main cable can often be buried just a few inches deep or hidden under mulch. Always check local electrical codes, but most areas permit homeowner installation.
How can I make my solar lights brighter?
To make your solar lights brighter, ensure their solar panels receive maximum direct sunlight for 6-8 hours daily – trim any obstructing foliage. Keep the solar panel and light diffuser clean from dirt, dust, and pollen. If older, replace the internal rechargeable battery with a fresh, good-quality NiMH battery. Some higher-end solar lights also come with brighter LEDs or larger panels, which might be a worthwhile upgrade.
What’s the best way to secure outdoor string lights without drilling?
To secure outdoor string lights without drilling, consider using clever alternatives. Projects like “string light planters” (using weighted planters with posts) are excellent. You can also use temporary adhesive hooks (rated for outdoor use), zip ties to existing structures (fences, pergolas, gutters, trees), or magnet hooks if you have metal surfaces. Heavy-duty magnetic clips or even strong outdoor suction cups can also work for lighter strings.
Are battery-powered outdoor lights worth it for permanent installations?
Generally, battery-powered outdoor lights are not ideal for permanent, everyday illumination due to the ongoing need to replace or recharge batteries. They are better suited for temporary decorative lighting, motion-activated security lights that only activate occasionally, or areas where wiring is truly impossible. For permanent solutions, solar or low-voltage LED systems offer better consistency and lower maintenance in the long run.
Content Disclaimer
The information provided in this article is for general informational and educational purposes only, and is not a substitute for professional advice. While we strive to provide accurate and up-to-date information, individual circumstances and local regulations may vary. Always consult with qualified professionals (e.g., electricians for complex wiring, structural engineers for heavy constructions) and check local building codes before undertaking any DIY project, especially those involving electricity, tools, or structural changes. The author and publisher are not responsible for any personal injury, property damage, or other loss that may result from the use of the information contained herein.