Installing Outdoor Plumbing For Garden Maintenance Convenience
Want fewer trips to the hose, healthier plants, and less wasted water? Installing outdoor plumbing for garden maintenance convenience is the single most practical upgrade most homeowners can make. This guide walks you through planning, parts, installation, and upkeep so you can stop improvising with tangled hoses and start enjoying a clean, efficient system that saves time and water.
What you’ll get: clear steps to design and install outdoor plumbing for garden maintenance convenience, a comparison of irrigation options, tool and material checklists, troubleshooting tips, and real cost examples—everything to go from idea to working system.
Plan Your Outdoor Plumbing Layout for Efficient Garden Maintenance
Good results start before the first trench. Planning your layout determines water pressure needs, where frost-free spigots go, and how you route lines to minimize digging and disruption. An intentional design is the backbone of installing outdoor plumbing for garden maintenance convenience.
Define objectives: what “convenience” looks like
Ask practical questions: Do you want multiple hose bibs? Automatic drip lines? A dedicated water source for a greenhouse? Will you water raised beds by schedule or by hand? Write clear goals—this avoids retrofitting later.
Map the space: quick site survey
- Sketch the property footprint and mark existing water source(s).
- Note elevations: uphill runs reduce pressure; downhill helps gravity-fed systems.
- Locate utilities—call your local utilities line before digging.
- Mark garden beds, lawn areas, and hardscapes where permanent connections make sense.
Sizing and pressure considerations
Water pressure (psi) and flow rate (gpm) guide pipe size and number of zones. Typical residential pressure is 40–60 psi; many irrigation systems run well at 30–45 psi. If you plan multiple zones or long runs, upsizing pipe to 3/4″ or 1″ reduces friction loss.
Permits and local codes
Some municipalities require permits for outdoor plumbing work, backflow prevention, or changes to water service. Check local plumbing codes and if you’re connecting to municipal water, a backflow preventer is often mandatory.
Actionable checklist
- Create a simple map of the property and water needs.
- Measure distances to calculate pipe length and pressure drop.
- Call utility locating services and your local building department.
Essential Components and Materials for Outdoor Plumbing
Choosing the right parts keeps your system reliable. This section covers valves, piping, backflow prevention, and frost-free fixtures—components you’ll use when installing outdoor plumbing for garden maintenance convenience.
Piping options: PVC, CPVC, PEX, polyethylene
PVC is common for buried irrigation mains and valves. PEX offers flexibility for runs under decks or to spigots. Polyethylene (PE) is standard for drip irrigation laterals. Match material to use: high-pressure supply (PVC/PEX), flexible distribution (PE).
Key fixtures and hardware
- Hose bibs / frost-free spigots: install at exterior walls above grade and angled down slightly.
- Ball valves and gate valves: isolating sections for maintenance.
- Backflow preventer: protects municipal water from garden contamination.
- Pressure regulator: required for low-pressure drip systems.
- Anti-siphon devices: quick backflow protection for simple hose connections.
Valves and zone control
For automated watering, use electric solenoid valves (24VAC) and a simple controller. Manual ball valves are fine for hand watering and dividing zones. Consider a manifold to centralize control.
Filtration and water quality
A screen filter or sediment trap protects emitters in drip systems. If you’re on well water with iron or particulates, choose a larger micron-rated or multiple-stage filter.
Tools and consumables
Basic tools: trenching shovel or trencher, pipe cutters, PVC primer and cement, PEX fittings and crimp tool, Teflon tape, PVC unions for serviceable connections, and gravel or sand for bedding.
Actionable steps
- List components by location using your site map.
- Size pipes and select materials to match pressure and flow.
- Purchase extra fittings for contingencies.
How to Install Outdoor Plumbing For Garden Maintenance Convenience: Step-by-Step
This how-to section takes you from planning through to a working system. Follow these steps to ensure your project is efficient, safe, and durable when installing outdoor plumbing for garden maintenance convenience.
Step 1 — Prepare and protect
Gather permits, call utility locators, and set up a temporary watering plan for plants during construction. Move delicate containers or irrigation timers out of the work zone.
Step 2 — Trenching
Dig trenches to the recommended depth: typically 12–18 inches for frost protection; deeper in colder climates. Keep trenches straight where possible; avoid shallow roots. Slope the bottom slightly toward drains where frost heave is a risk.
Step 3 — Lay mains and connections
Lay the main supply line first. Use continuous runs with proper fittings and avoid sharp bends. Install unions or couplings at accessible locations for future repairs. Keep a slight slope for drainage.
Step 4 — Install backflow preventer and service valve
Mount the backflow preventer near the water source or at the meter, following local code. Add a service shutoff upstream for winterization and maintenance.
Step 5 — Install spigots, valves, and manifolds
Place frost-free spigots at logical access points. Install the manifold in a protected box or near the foundation for easy access. Wire solenoids to the controller, labeling each zone.
Step 6 — Connect irrigation laterals
For drip systems, run PE tubing from the manifold and branch with barbed fittings. For sprinklers, run pipe to pop-ups and set heads to cover the intended area with minimal overlap.
Step 7 — Test, adjust, and bury
- Pressurize the system and check for leaks.
- Adjust pressure regulators and sprinkler heads.
- Flush lines where needed and install filters on drip zones.
- Backfill trenches with sand or native soil, tamping to avoid settling.
Safety and inspection
Have an inspector review permanent connections if required. Always depressurize before working on the system and follow electrical safety when wiring controllers.
Actionable takeaways
- Label everything as you go—this saves headaches later.
- Install cleanout points for flushing lines every few hundred feet.
- Plan for accessibility: unions and accessible manifolds reduce future digging.
Irrigation Options: Choose What Fits Your Garden and Budget
There’s no one-size-fits-all answer. This section compares drip, sprinkler, soaker hoses, and hand-watered setups so you can match performance to the specific needs of installing outdoor plumbing for garden maintenance convenience.
Quick definitions
Drip irrigation: low-flow emitters that deliver water precisely to plant roots. Sprinklers: overhead or pop-up heads that cover larger areas. Soaker hoses: porous hoses that seep water along their length. Manual: hand watering via hose or watering can.
Comparison table: performance and use cases
| Feature | Drip | Sprinkler | Soaker Hose | Hand Watering |
|---|---|---|---|---|
| Water Efficiency | High | Medium | High | Variable |
| Installation Complexity | Medium | Medium–High | Low | Low |
| Best for | Beds, containers, vegetables | Lawns, large beds | Mixed beds, hedges | Small areas, spot treatment |
| Automation | Easy | Easy | Possible | Not automated |
Pros and cons
Consider the trade-offs. Drip systems conserve water but need filtration and occasional emitter cleaning. Sprinklers are great for lawns but lose water to evaporation. Soaker hoses are inexpensive but can clog or degrade.
Choosing by garden type
- Vegetable gardens: drip lines with emitters positioned at root zones.
- Raised beds: individual drip emitters or micro-sprayers.
- Lawns: rotary or spray sprinklers with matched precipitation rates.
- Ornamental beds: soaker hoses or drip with timers for longer soak cycles.
Actionable plan
- Group plants by water needs; design separate zones for each group.
- Use a controller with weather-sensor integration to avoid overwatering.
- Install pressure regulators on drip zones to protect emitters.
Maintenance, Winterizing and Troubleshooting Outdoor Plumbing
Your work isn’t done after the pipes are in. Regular care keeps the system reliable and extends component life—exactly the payoff you expect when installing outdoor plumbing for garden maintenance convenience.
Routine checks
- Inspect spigots and valves monthly for drips.
- Flush filters seasonally and after heavy sediment events.
- Check controllers quarterly and replace batteries yearly.
Winterizing
In cold climates, drain and blow out irrigation lines before the first freeze, or install automatic drain valves and insulate above-ground fixtures. Leave internal ball valves open during winter so water can drain.
Common problems and fixes
- Low pressure: check upstream valves, clogged filters, or excessive zone demand.
- Uneven coverage: adjust sprinkler nozzles or re-evaluate head spacing.
- Clogged emitters: flush lines and install a finer filter if sediment is recurring.
Record-keeping
Keep a simple maintenance log: installation dates, parts replaced, and issues found. This builds system knowledge and helps contractors troubleshoot later.
Actionable tips
- Label valves and zone wires near the controller.
- Keep spare emitters, O-rings and a small parts kit in your garden shed.
- Perform a seasonal system audit: pressure, flow, controller settings.
Case Studies, Cost Estimates and Real-World Examples
To ground expectations, here are compact real-world examples showing how installing outdoor plumbing for garden maintenance convenience pays off in time savings and water efficiency.
Case study A — Small urban garden (hand-to-automated)
Homeowner: 40′ x 20′ lot with several raised beds. Scope: add a manifold, two frost-free spigots, and a drip system for beds. Cost: about $900 in parts, one weekend DIY. Outcome: watering time reduced from 30 minutes daily to 10 minutes weekly; water use dropped by ~35%.
Case study B — Suburban lawn and perennial borders
Homeowner: 0.25 acre, new sprinkler zone for lawn and drip for borders. Scope: install 3/4″ supply line, 4 pop-up heads, 3 drip zones, backflow preventer. Cost: $2,800 including professional labor. Outcome: more consistent lawn health and lower runoff complaints to neighbors; timer integration reduced manual watering by 90%.
Cost breakdown (typical DIY ranges)
- Basic drip kit (beds): $100–$300
- Frost-free spigot: $40–$120 each
- Backflow preventer: $80–$300
- Piping and fittings (per 100ft): PVC $80–$150, PEX $120–$220
- Controller and valves (DIY): $200–$600
ROI considerations
Savings come from reduced manual labor, lower water bills, and healthier plants needing less replacement. For many gardeners, payback on equipment is 1–4 years depending on system size and water costs.
Actionable financial checklist
- Estimate materials and add 15% for misc parts.
- Get 2–3 pro quotes for labor if not DIY.
- Check local rebates for water-efficient irrigation (municipal programs often offer incentives).
Tools, Resources and Visual Content Suggestions
The right tools make the job safer and faster. Below are recommended tools, online resources, and ideas for images and infographics to help readers visualize the process of installing outdoor plumbing for garden maintenance convenience.
Recommended tools and where to get them
- Trencher or trenching shovel — Home Depot, local rental shops.
- PEX crimp tool or expansion kit — hardware stores and online vendors.
- PVC cutter, primer and cement — hardware stores.
- Soil probe and level — garden centers and online retailers.
- Multimeter for controller wiring checks — electronics stores.
Useful online resources
- EPA WaterSense — water-efficiency guidance and rebates
- Family Handyman — practical DIY plumbing instructions and videos
- Local utility websites — search for irrigation rebates and codes
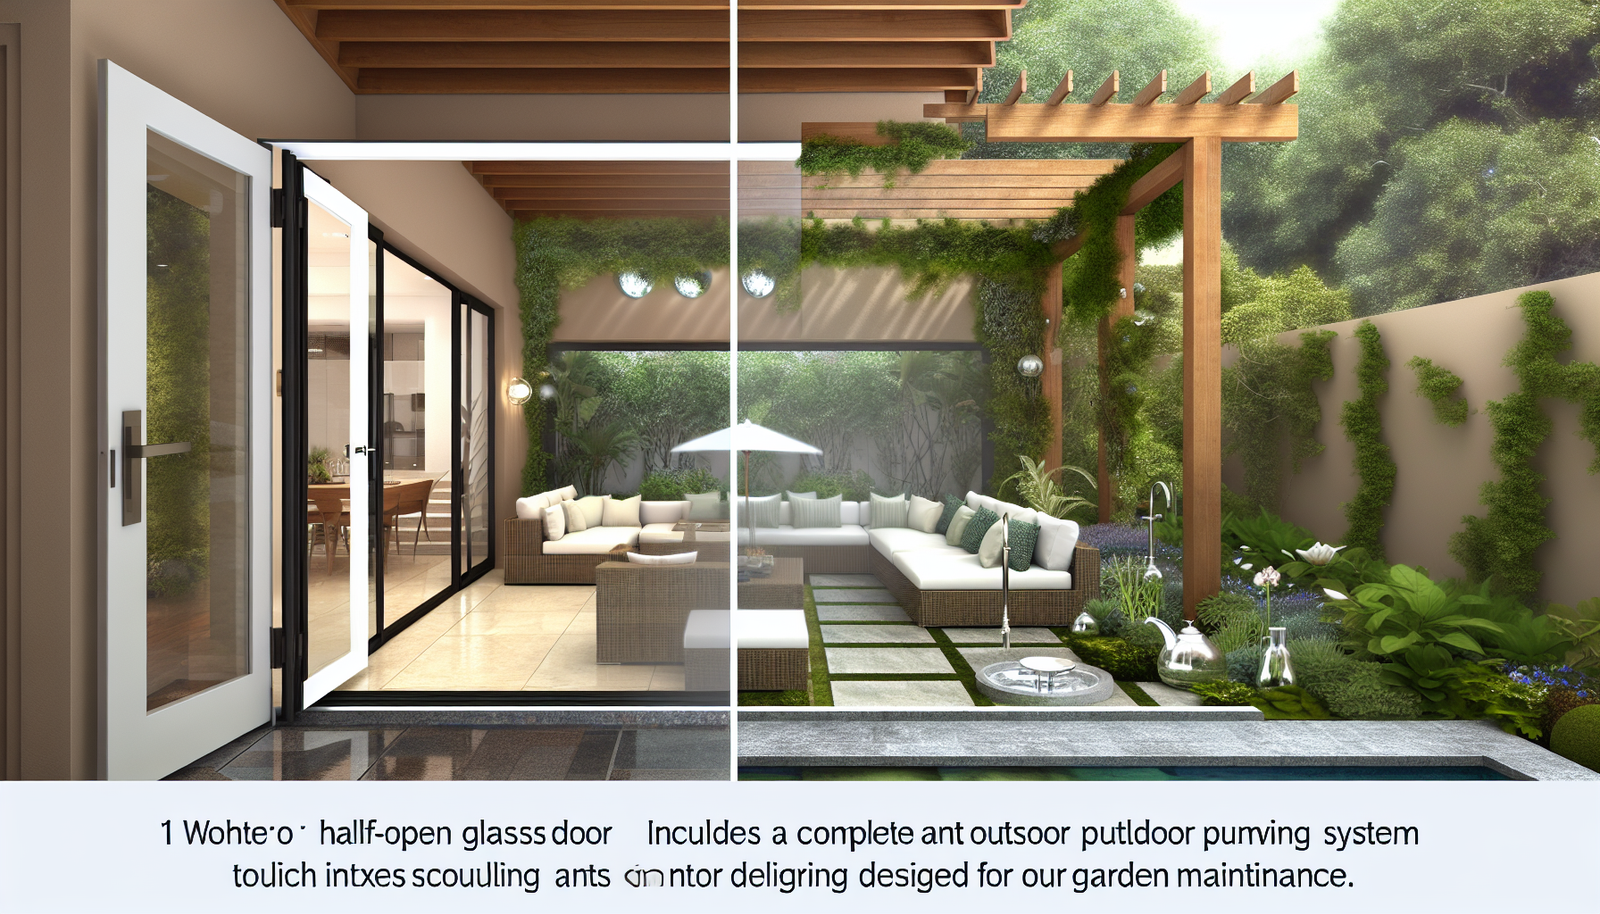
Visual content recommendations
Suggested images and infographics to accompany the article:
- High-resolution site map annotated with zones and pipe routes (infographic)
- Step-by-step photo series: trenching → laying pipe → installing manifold → testing
- Comparison infographic showing water use: drip vs sprinkler vs hand watering
- Close-ups of common fittings, backflow preventer, and frost-free spigot with labeled parts
Image alt-text suggestions
- Site map sketch with irrigation zones — alt: “Garden site map with irrigation zones and water source locations”
- Installing PVC main line in trench — alt: “Laying PVC underground for outdoor garden plumbing”
- Drip irrigation emitters near plant roots — alt: “Close-up of drip irrigation emitters at plant root zone”
- Backflow preventer mounted near water meter — alt: “Backflow preventer installed at property water supply”
Actionable next steps
- Create a visual plan before buying parts; use a simple drawing app or paper and pen.
- Take photos during installation; they’ll help with future troubleshooting and warranty claims.
- Label and document parts with photos and notes in your maintenance log.
Advanced Tips: Water-Efficiency and Smart Integrations
Small smart upgrades amplify convenience and conserve water. If you’re focused on efficiency when installing outdoor plumbing for garden maintenance convenience, these tactics deliver measurable results.
Smart controllers and sensors
Weather-based controllers adjust schedules automatically based on local forecasts or on-site rain sensors. Wi‑Fi-enabled controllers let you adjust schedules from your phone—excellent for travel or variable weather.
Soil moisture sensors and flow monitoring
Soil moisture probes prevent overwatering by running cycles only when the root zone dries below a set threshold. Flow sensors detect leaks or broken heads early by alerting you to abnormal usage.
Reclaimed water and graywater considerations
Some properties can use graywater for irrigation; this often requires separate plumbing and local approvals. Reclaimed water systems need clear labeling and backflow prevention to avoid cross-connection with potable supplies.
Actionable upgrades
- Install a weather-based controller with local climate integration.
- Add a flow meter on the main line to detect leaks early.
- Consider graywater rules locally before planning reuse systems.
Further Reading & Internal Resources
Want deeper dives? Check these related guides:
- How to Install Drip Irrigation — step-by-step emitter placement and maintenance.
- Garden Water Conservation Tips — quick wins to lower water usage.
- Outdoor Plumbing Tools and Kits — recommended gear for DIYers.
- Winterizing Irrigation Systems — protect your pipes from freeze damage.
Frequently Asked Questions
Do I need a permit to install outdoor plumbing?
Permit requirements vary by municipality. Many places require permits for new water service, backflow devices, or significant plumbing changes. Check with your local building department before starting work.
What is a frost-free spigot and do I need one?
A frost-free spigot has a long stem that drains water below the frost line, reducing freeze damage risk. They are recommended in climates with freezing winters for reliability.
Can I connect an irrigation system to well water?
Yes. Well water often works well for irrigation, but you should consider filtration, pressure, and pump capacity. If you’re using a pressure tank, ensure the irrigation demand won’t cycle the pump excessively.
How deep should I bury irrigation pipes?
Depth depends on climate. Typical depths are 12–18 inches to protect from frost; deeper in colder regions. Keep local frost depth and code requirements in mind.
What’s the best irrigation for vegetable gardens?
Drip irrigation is usually best. It directs water to the root zone, reduces leaf wetness (which lowers disease risk), and saves water compared to overhead sprinklers.
Conclusion & Next Steps
Installing outdoor plumbing for garden maintenance convenience transforms how you care for plants. It saves time, reduces water waste, and improves garden health. Start with a clear plan, pick the right components, and follow tested installation steps. Whether you DIY or hire a pro, the payoff comes quickly in reduced chores and better results.
Ready to begin? Sketch your site map, get quotes for any required permits or professional work, and gather parts for your first zone. For more targeted help, see our guides on drip irrigation and winterizing systems.
Primary keyword summary: Installing outdoor plumbing for garden maintenance convenience reduces labor, saves water, and improves plant health—plan well, choose the right system, and maintain it regularly.
If you want, I can draft a simplified parts list and a printable site map template tailored to your property—tell me your yard size, water source, and plant types and I’ll prepare it.
Content Disclaimer
The information in this article is provided for educational purposes only. It does not replace professional plumbing or building code advice. Local codes and conditions vary—consult licensed professionals where required. Results may vary based on individual circumstances.
Categories
- Accent Walls & Ceilings (84)
- Art Curation & Gallery (83)
- Bedding Style Trends (89)
- Bedroom Makeover (96)
- Bohemian & Eclectic Styles (80)
- DIY & Budget-Friendly Decor (78)
- Eco-Friendly Design (83)
- Furniture Care (87)
- Home Decor & Design Ideas (181)
- Home Wellness Spaces (103)
- Integrated Outdoor Living (91)
- Japandi Style (84)
- Kids and Nursery Decor (73)
- Living Room Decor (99)
- Mix & Match Techniques (95)
- Modern & Contemporary Design (88)
- Rug Sizing & Placement (89)
- Scandinavian Design Inspiration (51)
- Seasonal Home Decor (100)
- Small Space Solutions (93)
- Wall Art & Painting Tips (94)
Recent Comments
Archives
Product Gallery
-
 Majestic African Wildlife Canvas Art for Stylish Home Decor
Rated 5.00 out of 5
Majestic African Wildlife Canvas Art for Stylish Home Decor
Rated 5.00 out of 5 -
 Cozy Irregular Green Plush Rug for Nordic Living Spaces
Rated 5.00 out of 5$44.89 – $283.06Price range: $44.89 through $283.06
Cozy Irregular Green Plush Rug for Nordic Living Spaces
Rated 5.00 out of 5$44.89 – $283.06Price range: $44.89 through $283.06 -
 Scandinavian Geometric Area Rugs for Stylish Home Décor
Rated 5.00 out of 5$32.24 – $488.38Price range: $32.24 through $488.38
Scandinavian Geometric Area Rugs for Stylish Home Décor
Rated 5.00 out of 5$32.24 – $488.38Price range: $32.24 through $488.38